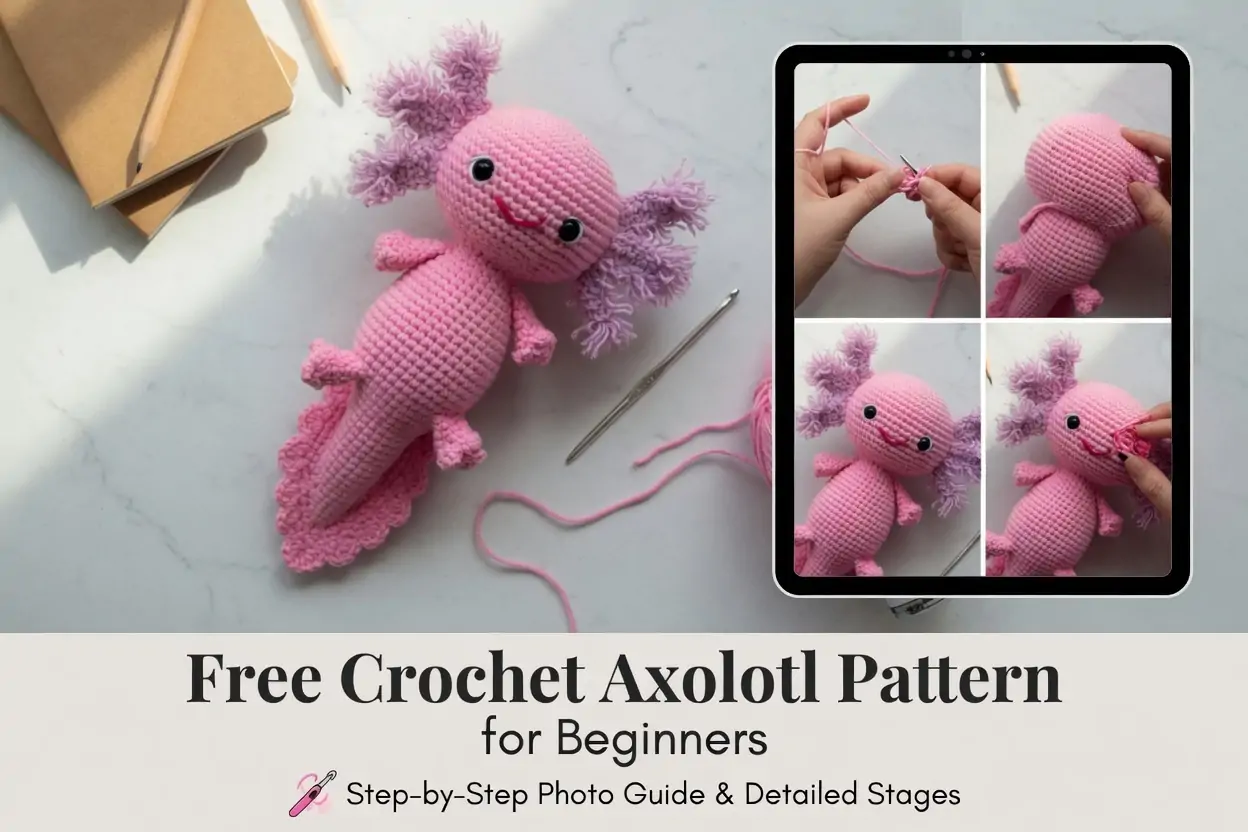
Free Crochet Axolotl Pattern for Beginners, If you’ve spent more than five minutes on crafting TikTok recently, you already know about axolotls. These wide-eyed, eternally smiling amphibians with their wild feathery gills have become one of the most beloved animals in internet culture — and in the crochet world, they’re absolutely everywhere.
A crochet axolotl is the kind of project that gets an immediate reaction. People pick it up, turn it around in their hands, and almost always ask, “Can you make one for me?” It’s soft, it’s distinctive, and those little feathery gills are genuinely unlike anything else in the amigurumi world.
This free beginner crochet axolotl pattern gives you everything you need: a complete round-by-round pattern, a full materials list, assembly instructions, and plenty of ideas for making it your own. No experience beyond basic single crochet required.
Let’s get into it.
What Is an Axolotl? (And Why Is Everyone Crocheting One?)
In case you’re new to the axolotl obsession: these are real animals. They’re a species of aquatic salamander native to Mexico, and they’re famous for a few reasons.
First, they never fully go through metamorphosis — they keep their feathery external gills their whole lives, which gives them that unmistakable crown of fluffy plumes around their heads. Second, they can regenerate lost limbs. Third, they have a permanent expression that looks exactly like a contented smile, which makes them basically impossible not to love.
In the wild, they’re critically endangered. In internet culture, they’re absolutely thriving. Axolotls have become one of the most viral animals on social media, with millions of videos and photos shared every month.
In crochet? They’re perfect. Those gill plumes are a genuinely unique design element — no other amigurumi creature has them — and the wide, rounded body shape is beginner-friendly while still looking immediately recognizable. It’s a project that rewards new makers and satisfies experienced ones equally.
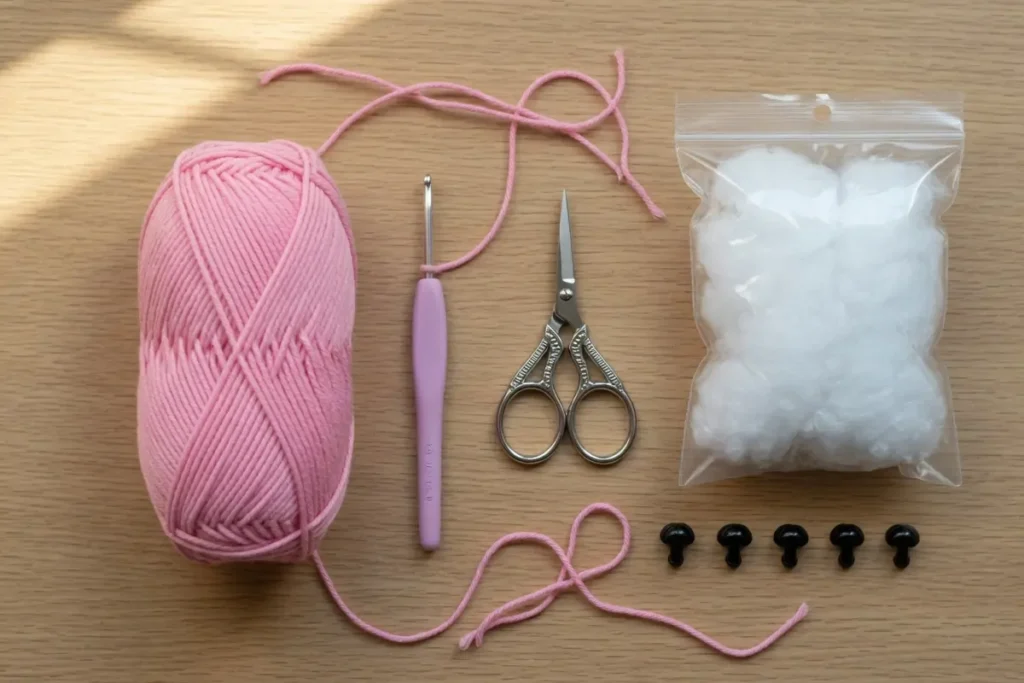
What You Need: Materials List
This pattern uses very modest amounts of yarn. It’s a great stash-buster project — most of the axolotl is a single color, so even small yarn remnants are useful here.
Yarn
For the most beginner-friendly result, choose a firm DK or worsted weight cotton or cotton-blend yarn. Cotton holds its shape well, keeps stitch definition crisp (which matters for the gills), and is available in the soft pastel shades that make axolotls look their best.
Eco-friendly yarn choices that work beautifully for this project:
- Organic cotton DK — firm, washable, biodegradable. The slightly matte finish makes the gills look especially realistic.
- Recycled cotton — made from textile industry scraps. Often available in lovely natural neutrals.
- Bamboo blend — slightly silkier, gives a soft sheen that works wonderfully for the leucistic (white) axolotl colorway.
Yarn quantities needed:
- Main color (body): approximately 40–50g
- Gill color (same or slightly darker): approximately 10–15g
- Accent color (optional): small scrap amount
Hook and Notions
- 3.5mm crochet hook for DK weight, or 4mm for worsted weight
- Polyfill stuffing (eco or recycled stuffing preferred)
- Two 10–12mm safety eyes
- Tapestry needle for assembly
- Stitch markers
- Scissors
- Pins for positioning before sewing
Finished Size
Using DK weight cotton and a 3.5mm hook, the finished axolotl measures approximately 18–20 cm (7–8 inches) long from nose to tail tip, with a body about 7 cm (2.75 inches) wide at the widest point.
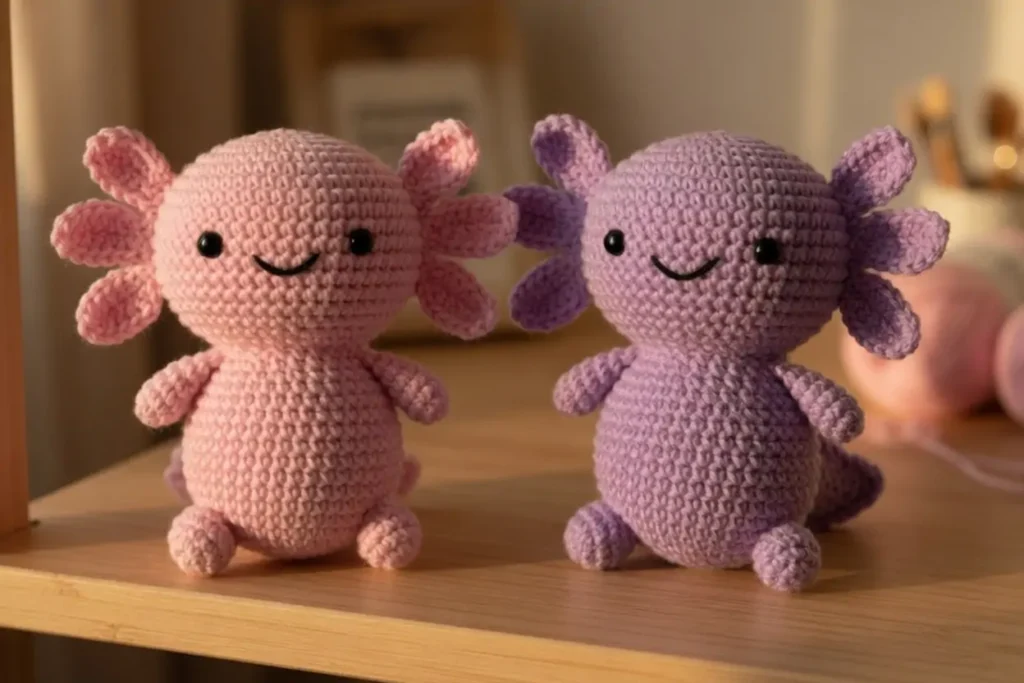
Axolotl Colors: Which One Will You Make?
Real axolotls come in several color morphs, and each one translates beautifully to yarn. This is one of the most fun decisions in the whole project.
- Wild type — mottled brown and olive with golden speckles. Use a variegated or tweedy brown yarn.
- Leucistic (most popular) — pale pink or peach body with dark eyes and pink gills. The classic axolotl look most people picture.
- Golden albino — warm golden-yellow body with pale pink gills. Stunning and less commonly seen in crochet.
- Melanoid — dark charcoal or near-black with deep purple-gray gills. Dramatic and beautiful.
- Lavender / lilac — not a natural color, but extremely popular in crochet. Soft purple yarn creates an almost magical look.
The leucistic pink version is the most searched and most immediately recognizable. But honestly — any of these will get a wonderful reaction.
Understanding the Pattern Before You Start
This pattern uses standard amigurumi construction. The body and head are worked in one continuous piece. The legs, tail, and gills are made separately and attached during assembly.
- All pieces are worked in a continuous spiral — no joining rounds or turning chains unless specified
- Use a stitch marker to track where each round begins
- The invisible decrease (sc2tog through front loops only) gives much cleaner results than a regular decrease
- Attach safety eyes before the body is fully closed
Abbreviations
- MR — magic ring
- sc — single crochet
- inc — increase (2 sc in same stitch)
- dec — invisible decrease (sc2tog through front loops only)
- sl st — slip stitch
- ch — chain
- st(s) — stitch(es)
Free Crochet Axolotl Pattern — Complete Instructions
Body and Head — Make 1
Work in main body color throughout in a continuous spiral.
Round 1: 6 sc in magic ring (6 sts)
Round 2: Inc in each st around (12 sts)
Round 3: *Sc 1, inc* repeat 6 times (18 sts)
Round 4: *Sc 2, inc* repeat 6 times (24 sts)
Round 5: *Sc 3, inc* repeat 6 times (30 sts)
Round 6: *Sc 4, inc* repeat 6 times (36 sts)
Rounds 7–11: Sc in each st around, 5 rounds (36 sts)
Round 12: *Sc 4, dec* repeat 6 times (30 sts)
Round 13: Sc in each st around (30 sts)
Round 14: *Sc 3, dec* repeat 6 times (24 sts)
Round 15: Sc in each st around (24 sts)
Attach safety eyes now — on Round 8–9, spaced 8–10 stitches apart on the wider part of the face. Take your time with placement before clicking them into place.
Round 16: *Sc 2, dec* repeat 6 times (18 sts) — begin stuffing firmly
Round 17: *Sc 1, dec* repeat 6 times (12 sts) — continue stuffing
Round 18: Dec 6 times (6 sts) — finish stuffing, close off and weave in end
Front Legs — Make 2
Work in main body color.
Round 1: 5 sc in magic ring (5 sts)
Rounds 2–5: Sc in each st around, 4 rounds (5 sts)
Fasten off leaving a 20 cm tail. Do not stuff.
Back Legs — Make 2
Work in main body color.
Round 1: 6 sc in magic ring (6 sts)
Rounds 2–6: Sc in each st around, 5 rounds (6 sts)
Fasten off leaving a 20 cm tail. Do not stuff.
Tail
Work flat in rows in main body color.
Row 1: Ch 10. Sc in 2nd ch from hook and in each ch across. (9 sc) Turn.
Row 2: Ch 1, sc in each st across. (9) Turn.
Row 3: Ch 1, sc2tog, sc 5, sc2tog. (7) Turn.
Row 4: Ch 1, sc in each st across. (7) Turn.
Row 5: Ch 1, sc2tog, sc 3, sc2tog. (5) Turn.
Row 6: Ch 1, sc in each st across. (5) Turn.
Row 7: Ch 1, sc2tog, sc 1, sc2tog. (3) Turn.
Row 8: Ch 1, sc in each st across. (3)
Fasten off leaving a 20 cm tail. The wide end attaches to the body.
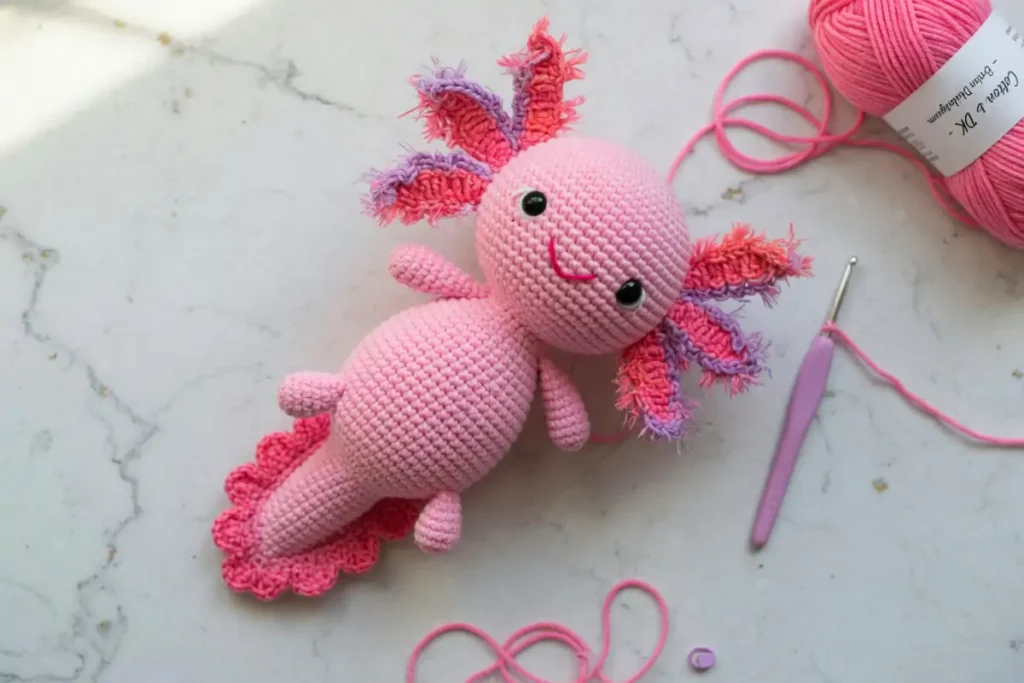
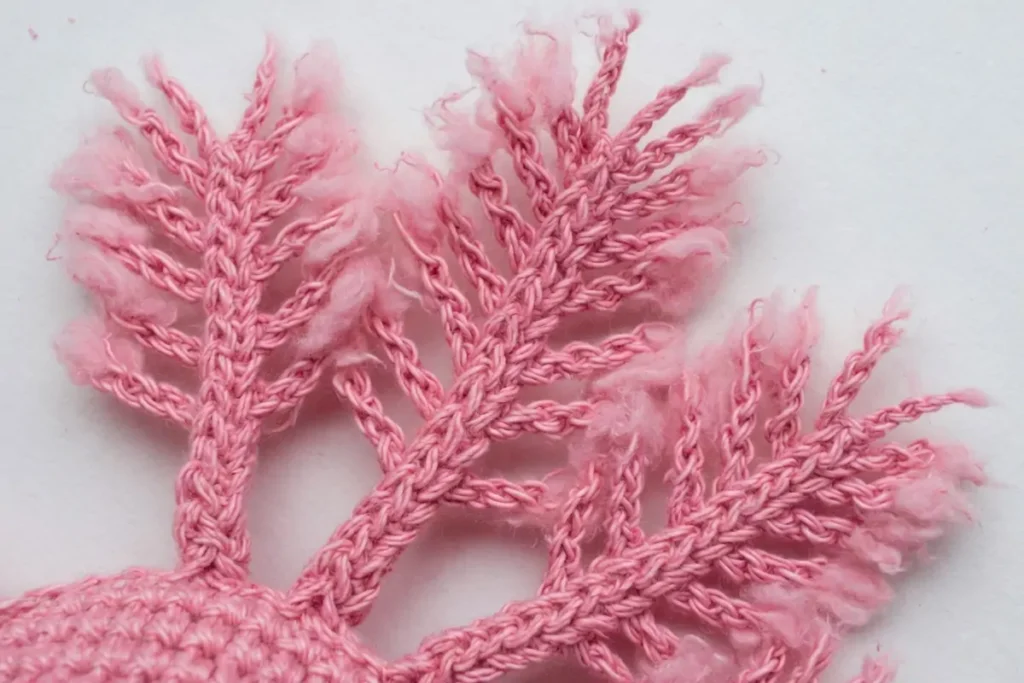
Gills — Make 6
The gills are the most distinctive part of your axolotl. Each gill has a main stalk with three short branches creating that feathery look. Work in gill color.
For each gill:
Main stalk: Ch 10. Starting in the 2nd ch from hook, sl st back along all 9 chains to the base. Do not fasten off.
Branch 1: Ch 5. Sl st back along 4 chains. Sl st along the main stalk 3 stitches toward the tip.
Branch 2: Ch 4. Sl st back along 3 chains. Sl st along the main stalk 2 stitches toward the tip.
Branch 3: Ch 3. Sl st back along 2 chains. Sl st to the tip of the main stalk.
Fasten off leaving a 15 cm tail for attaching.
Don’t worry if the gills look a little messy as you make them — they’re meant to be floppy and slightly irregular. That’s what makes them look realistic.
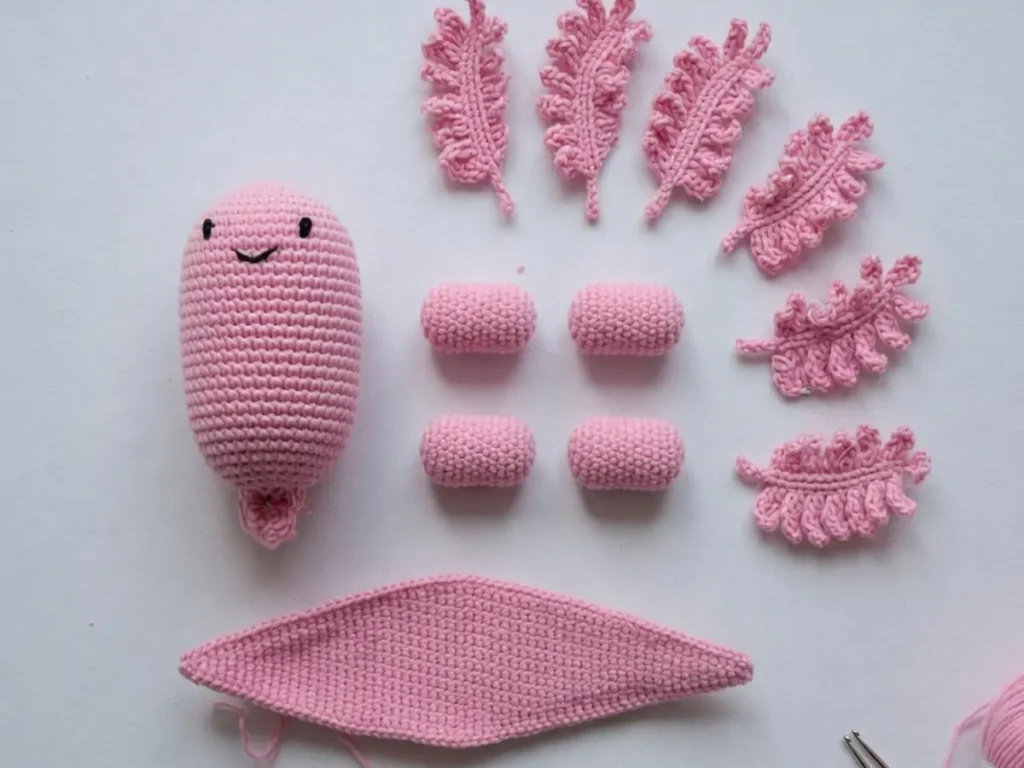
Assembling Your Crochet Axolotl
Assembly is where your axolotl really comes to life. Pin everything before sewing a single stitch — moving a leg by two stitches makes a significant difference in the final look.
Step 1: Embroider the Smile
Before attaching any pieces, embroider the smile onto the front of the face. Use dark brown or pink yarn on a tapestry needle. Create a gentle curved line below the eyes — start below the left eye, curve down to the center, then back up below the right eye. Work the stitch twice for a bolder look.
Step 2: Attach the Gills
Position three gills on each side of the head, clustered around Rounds 5–7. Fan them out so they radiate upward and outward. Sew each gill base securely with a small circular whipstitch — firm enough to hold, loose enough for natural movement.
Step 3: Attach the Front Legs
Position front legs on either side of the body at approximately Rounds 14–15, pointing slightly forward and outward. Whipstitch all the way around the leg circumference and pull firmly.
Step 4: Attach the Back Legs
Position back legs toward the tail end at approximately Rounds 9–10 on the underside, pointing slightly backward and outward. Sew the same way as the front legs.
Step 5: Attach the Tail
Sew the wide end of the tail to the very back of the body on the center underside. The tail should point slightly upward at the tip. Secure all the way across with a firm whipstitch.

Creative Ways to Customize Your Axolotl
Add a Tiny Bucket Hat
The “axolotl with bucket hat” version is genuinely viral on TikTok. The hat is worked separately — a small flat circle top in rounds with a brim added around the edge — then stitched lightly to sit between the gills. Use a contrasting color for maximum effect.
Make It Extra Squishy
For a softer, squishier result, overstuff the body slightly and use a slightly looser tension. This gives the axolotl a round, huggable shape versus a firmer sculptural look.
Make a Mini Keychain Version
Use fingering weight yarn and a 2mm hook to create a miniature axolotl about 8 cm long — perfect as a keychain or bag charm.
Make a Full Color Family
Make a set in all five color morphs: wild type, leucistic, golden, melanoid, and lavender. A full family displayed together makes a beautiful collection piece.
Tips for a Beautiful Result
The Gills Are Everything
Take your time making the gills evenly, position them carefully, and don’t rush the attachment. A well-placed set of gills transforms a good axolotl into a great one.
Use the Invisible Decrease Throughout
The body tapers quite noticeably, which means decrease rows are visible with a standard decrease. The invisible decrease keeps the surface smooth and professional-looking.
Don’t Skip the Smile
The embroidered smile is what gives your axolotl its whole personality. A gentle, natural arc below the eyes — not too straight, not too curved — is what you’re aiming for.
Block the Gills After Assembly
If gills are curling or not sitting right, light wet blocking fixes this beautifully. Wet the gills only, shape with fingers, pin to a foam mat, and let dry completely. Cotton responds especially well to this technique.
Who Will Love a Crochet Axolotl?
- Kids and teens who play Minecraft (axolotls are famously adorable in the game)
- Biology students — axolotls are genuine research subjects for their regeneration ability
- Anyone who follows #axolotl on TikTok or Instagram
- Valentine’s Day recipients — “You make my heart grow back (like an axolotl)” is an excellent message
- Get well soon gifts — the regeneration connection is genuinely meaningful
- Desk companions — the wide, flat body sits perfectly without tipping over
Frequently Asked Questions
Is this crochet axolotl pattern really free?
Yes, completely. This full pattern is free to use for personal projects, gifts, and finished items for sale. No purchase or sign-up needed.
How difficult is this pattern for a true beginner?
If you can work single crochet in the round and do basic increases and decreases, you can make this. The gills involve a chaining technique that’s slightly different from standard amigurumi but is straightforward once you try it. Confidently beginner-level overall.
How long does it take to make a crochet axolotl?
Most beginners finish in 4–6 hours. Experienced amigurumi makers often complete it in under 3 hours. Breaking it across two evenings makes the project very manageable.
What’s the best yarn color for an axolotl?
The leucistic pink (soft peach-pink) is the most popular and immediately recognizable. Lavender has become enormously popular on social media — if you want shareable photos, soft purple is a very strong choice.
Can I sell finished axolotls made from this free pattern?
Yes. This pattern is free to use for items you sell at craft markets, on Etsy, or anywhere else. We’d love it if you mentioned where you found the pattern — but it’s not required.
How do I make the gills look more realistic?
Three things help most: use a slightly smaller hook than your yarn calls for, work each branch chain tightly for a denser plume, and angle the gills upward and outward rather than hanging straight down. Light blocking after assembly completes the look beautifully.
My axolotl keeps tipping forward — how do I fix it?
This usually means the head is overstuffed relative to the body, or the front legs are too far forward. Try redistributing stuffing slightly toward the tail end. A small bag of dried beans tucked inside the body also works well for display pieces that need to sit flat.
Final Thoughts
There’s a reason the crochet axolotl has become one of the most popular amigurumi patterns on the internet. It’s genuinely fun to make, produces something immediately recognizable, and the finished result makes people’s faces light up every single time.
The pattern is beginner-friendly without being boring for experienced makers. The gills are a unique challenge. The color possibilities are genuinely exciting. And the finished axolotl — wide smile, feathery crown, stubby little legs — is the kind of thing that ends up living permanently on someone’s desk.
Make it in leucistic pink for the classic look. Make it in lavender for the shareable photo. Make it in melanoid black for something dramatic and unexpected.
However you make it, you’ll end up with something wonderful. Share yours in the comments — we love seeing every version.
Happy crocheting.