
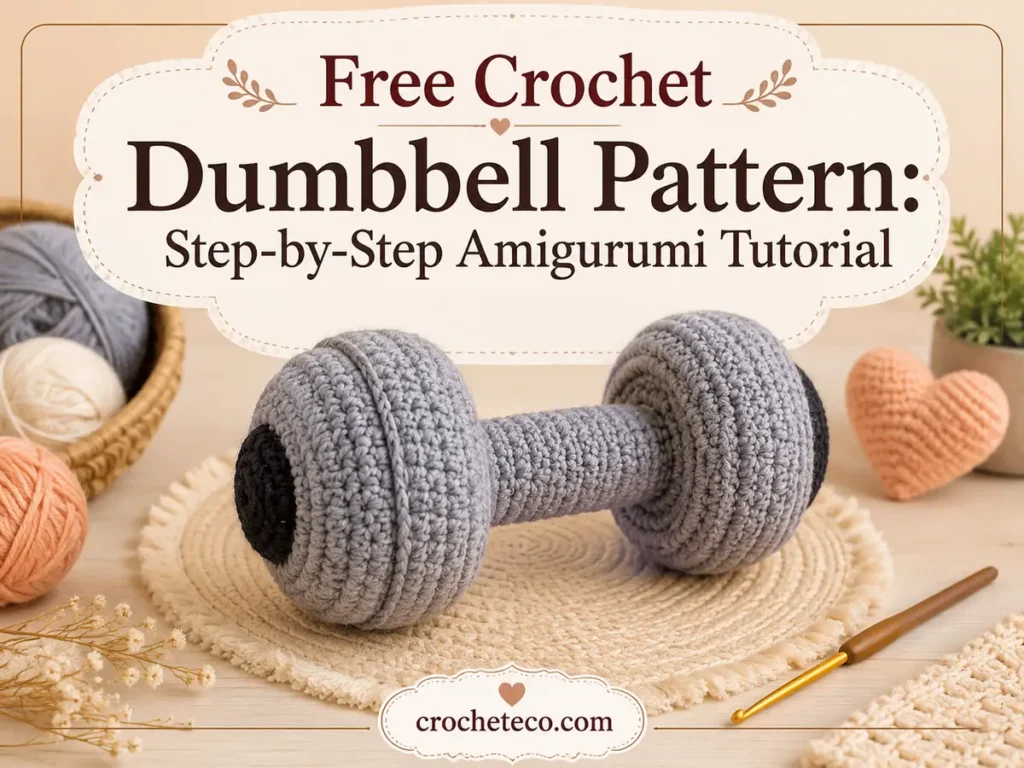
Free Crochet Dumbbell Pattern : A fitness fanatic who practically sleeps with their protein shaker? This one’s for you.
A crochet dumbbell is one of those projects that makes people genuinely laugh — and then immediately ask for one. It’s cute, it’s clever, and it takes less yarn than you’d use on a dishcloth. Whether you want to make a gift that actually gets a reaction or you’re just looking for a fun amigurumi project for the weekend, this free crochet dumbbell pattern delivers.
And the best part? You don’t need advanced skills. If you know how to crochet in the round, you can make this. Simple as that.
In this guide, you’ll get a complete, free crochet dumbbell pattern with step-by-step instructions, materials list, sizing tips, and plenty of ideas for making it your own.
Why Crochet a Dumbbell?
Okay, fair question. The world has plenty of actual dumbbells. Why crochet one?
Because the handmade version does something the store-bought kind can’t: it makes people smile the second they see it.
A crocheted dumbbell is a genuinely thoughtful gift for the gym lover in your life. It’s soft enough to sit on a desk, funny enough to make a great joke gift, and impressive enough that people can’t believe you made it by hand. It also works as a baby toy (completely safe, soft, washable), a cat toy, or a fun photo prop for fitness content creators.
It’s also a perfect stash-buster. You need barely any yarn — leftover worsted-weight or DK in any gray, silver, or bold color works beautifully.
Who Is This Pattern For?
- Beginner to intermediate crocheters who know how to work in the round
- Gift-makers who want something funny, clever, and genuinely useful as decor
- Amigurumi fans looking for a quick weekend project
- Eco-minded crafters who want to use up small amounts of natural or recycled yarn
The whole project takes around 2–4 hours depending on your pace. It’s satisfying, it’s fast, and the result is completely charming.
What You Need: Materials List
This project uses very little yarn, so it’s perfect for scraps. Here’s everything you’ll need before you start.
Yarn
For the most realistic-looking dumbbell, choose a firm yarn that holds its shape well. Cotton, cotton-blend, or a firm worsted weight acrylic all work here. Avoid overly fluffy or fuzzy yarn — it hides the stitch definition and makes the dumbbell look less crisp.
- Main color (plates + bar): approximately 40–60g of gray, charcoal, or black worsted weight yarn
- Accent color (optional ring detail): small amount of any bold color — red, yellow, and neon green all look great
Eco-friendly yarn choices that work perfectly here:
- Organic cotton — firm, washable, and biodegradable. Great if you’re making this for a baby.
- Recycled cotton — made from textile waste. Often comes in beautiful neutral tones.
- Bamboo blend — slightly more drape, but holds up well for amigurumi-style projects.
Hook and Notions
- 4mm (G/6) crochet hook for worsted weight yarn, or 3.5mm for DK weight
- Polyfill stuffing (use an eco or recycled stuffing if possible)
- Tapestry needle for assembly and weaving in ends
- Stitch markers to track rounds
- Scissors
- Optional: safety eyes (8–10mm) for a playful cartoon look
Finished Size
Using worsted weight yarn and a 4mm hook, the finished dumbbell measures approximately 17–18 cm (about 7 inches) long with each weight plate about 6 cm (2.5 inches) in diameter. Perfect desk-sized proportions.
Scale up with bulky yarn and a 6mm hook for a bigger version, or down with fingering weight and a 2.5mm hook for a miniature keychain dumbbell.
Amigurumi Basics: What to Know Before You Start
This pattern uses standard amigurumi techniques. If you’ve made stuffed animals or 3D crochet pieces before, you’re already set. If this is your first time working in the round, here’s a quick refresher on the key techniques.
Magic Ring (MR)
The magic ring (also called a magic circle or adjustable ring) is how amigurumi pieces begin. It creates a tight, clean center with no hole. If you’re not comfortable with magic rings yet, you can chain 2 and work your first round of stitches into the second chain from the hook — it works as a substitute.
Working in a Continuous Spiral
Unlike flat crochet rows, amigurumi is worked in a continuous spiral. You don’t join rounds or chain up at the end — just keep going. Use a stitch marker to track where each round begins.
Increases and Decreases
- Inc (increase): work 2 sc into the same stitch
- Dec or sc2tog (invisible decrease): insert hook into front loop of next st, then front loop of st after, yarn over and pull through both loops, yarn over and pull through both loops on hook
The invisible decrease is the standard for amigurumi — it leaves a much cleaner look than a regular decrease.
Free Crochet Dumbbell Pattern
This pattern makes one complete dumbbell with two weight plates and one connecting bar. Both plates are identical, so you’ll make them twice.
Abbreviations
- MR — magic ring
- sc — single crochet
- inc — increase (2 sc in same stitch)
- dec — invisible decrease (sc2tog through front loops)
- sl st — slip stitch
- ch — chain
- st(s) — stitch(es)
- BLO — back loop only
- FLO — front loop only
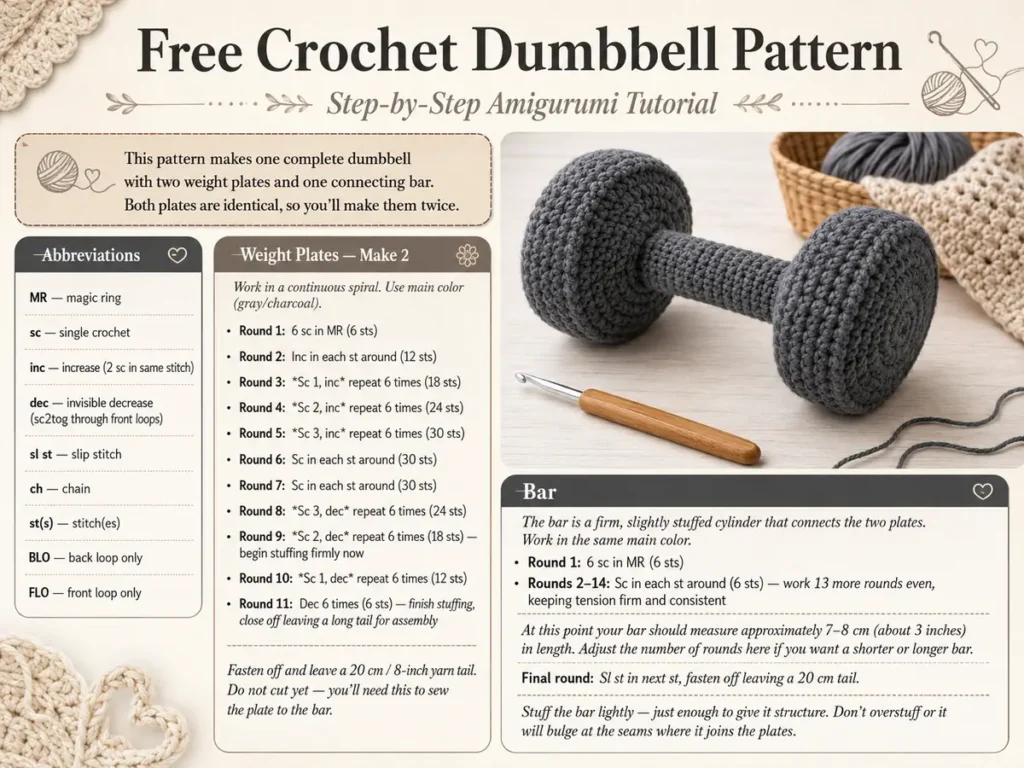
Weight Plates — Make 2
Work in a continuous spiral. Use main color (gray/charcoal).
Round 1: 6 sc in MR (6 sts)
Round 2: Inc in each st around (12 sts)
Round 3: *Sc 1, inc* repeat 6 times (18 sts)
Round 4: *Sc 2, inc* repeat 6 times (24 sts)
Round 5: *Sc 3, inc* repeat 6 times (30 sts)
Round 6: Sc in each st around (30 sts)
Round 7: Sc in each st around (30 sts)
Round 8: *Sc 3, dec* repeat 6 times (24 sts)
Round 9: *Sc 2, dec* repeat 6 times (18 sts) — begin stuffing firmly now
Round 10: *Sc 1, dec* repeat 6 times (12 sts)
Round 11: Dec 6 times (6 sts) — finish stuffing, close off leaving a long tail for assembly
Fasten off and leave a 20 cm / 8-inch yarn tail. Do not cut yet — you’ll need this to sew the plate to the bar.
Bar
The bar is a firm, slightly stuffed cylinder that connects the two plates. Work in the same main color.
Round 1: 6 sc in MR (6 sts)
Rounds 2–14: Sc in each st around (6 sts) — work 13 more rounds even, keeping tension firm and consistent
At this point your bar should measure approximately 7–8 cm (about 3 inches) in length. Adjust the number of rounds here if you want a shorter or longer bar.
Final round: Sl st in next st, fasten off leaving a 20 cm tail.
Stuff the bar lightly — just enough to give it structure. Don’t overstuff or it will bulge at the seams where it joins the plates.
Your sunglasses survived the beach, the car dash, the bottom of your bag — but did they survive without a scratch? If your answer involves a cringe, you’re not alone. Handmade Crochet Sunglasses Case: Easy Pattern + Pro Tips
Accent Ring — Optional, Make 2
This small flat circle is sewn on the outside face of each plate to mimic the decorative ring you see on real dumbbells. It’s optional but adds a really nice finished detail.
Use accent color (red, yellow, or any bold color).
Round 1: 6 sc in MR (6 sts)
Round 2: Inc in each st around (12 sts)
Round 3: *Sc 1, inc* repeat 6 times (18 sts)
Fasten off leaving a long tail. This flat circle is sewn onto the outside face of each completed weight plate.
Assembling Your Crochet Dumbbell
This is the most important step — and the one where patience really pays off. A well-assembled dumbbell looks professional. A rushed one shows at the seams.
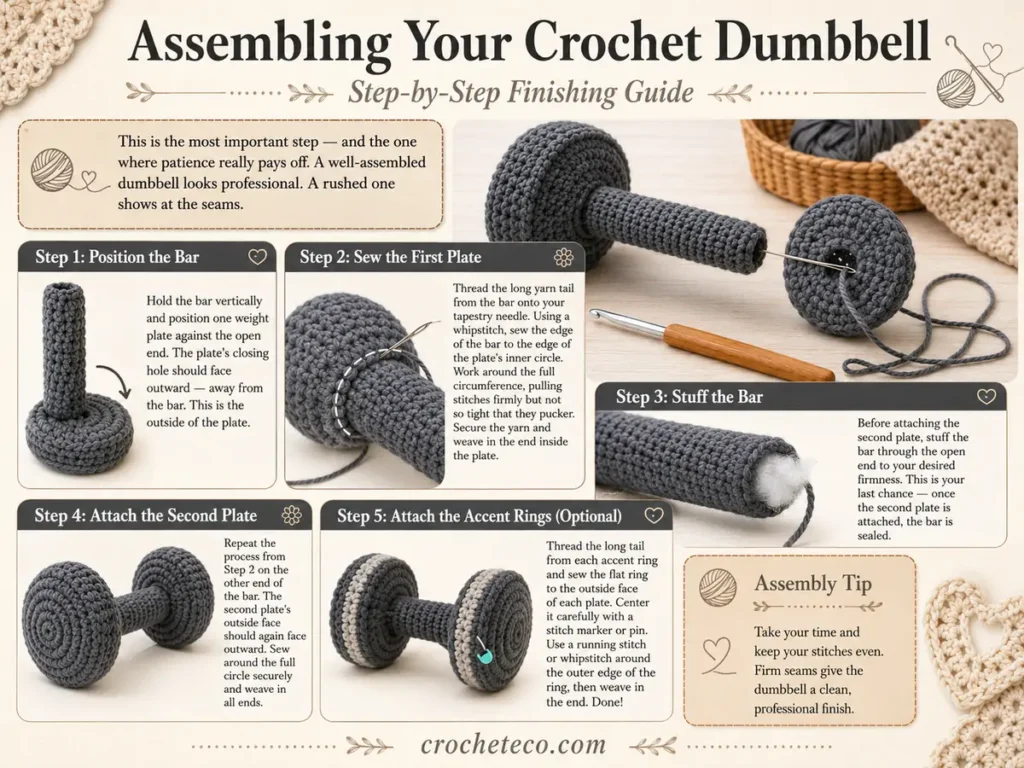
Step 1: Position the Bar
Hold the bar vertically and position one weight plate against the open end. The plate’s closing hole (where you pulled the last 6 stitches together) should face outward — away from the bar. This is the “outside” of the plate.
Step 2: Sew the First Plate
Thread the long yarn tail from the bar onto your tapestry needle. Using a whipstitch, sew the edge of the bar to the edge of the plate’s inner circle. Work your way around the full circumference of the bar, pulling stitches firmly but not so tight that they pucker.
Once fully attached, run the needle through the plate a few times to secure, then weave in the end inside the plate.
Step 3: Stuff the Bar (if not already done)
Before attaching the second plate, stuff the bar to your desired firmness through the open end. This is your last chance — once the second plate is on, it’s sealed.
Step 4: Attach the Second Plate
Repeat the process from Step 2 on the other end of the bar. The second plate’s outside face should again face outward. Sew around the full circle securely and weave in all ends.
Step 5: Attach the Accent Rings (if using)
Thread the long tail from each accent ring and sew the flat ring to the outside face of each plate. Center it carefully — use a stitch marker or a pin to hold it in place while you sew.
Work a running stitch or whipstitch around the outer edge of the ring and weave in the end. Done!
Creative Customization Ideas
The basic gray dumbbell is classic, but there’s a lot of room to make this project your own.
Personalize with Their Favorite Color
Real gym dumbbells are often color-coded by weight. You can do the same — make the accent rings in a specific color to match the recipient’s favorite, or do the whole dumbbell in their team colors, their school colors, or their gym’s branding palette.
Make It Mini
Use fingering weight yarn and a 2mm hook to make a dumbbell that’s small enough to hang as a keychain or charm. Use a small jump ring through the last stitch on one of the plates. A gym keychain is a genuinely practical, adorable gift.
Make It Jumbo
Go the opposite direction with super bulky yarn (category 6) and a 9mm hook. A giant crochet dumbbell makes a hilarious throw pillow or a great photo prop.
Add a Weight Label
Use a small strip of felt or woven label and attach it around the bar. You can write or embroider a fake weight on it — “5 lbs” or the recipient’s personal record. Very charming for a personalized gift.
Make a Matching Set
Make two identical dumbbells and pair them as a matching set. They could sit on either side of a desk, or go together in a cute gift basket with a gym-themed card.
Sizing Guide: Adjusting the Pattern
This pattern is very easy to scale. The key relationship to understand is that the bar diameter (6 stitches around = about 2 cm diameter) needs to fit inside the center of the weight plate. Keep the bar’s starting round at 6 stitches if you use the pattern as written.
| Yarn Weight | Hook Size | Plate Diameter | Bar Length | Finished Size |
|---|---|---|---|---|
| Fingering (Sock) | 2–2.5mm | ~3 cm | ~5 cm | ~11 cm / 4.5 in |
| DK | 3–3.5mm | ~5 cm | ~6 cm | ~16 cm / 6.5 in |
| Worsted | 4–4.5mm | ~6 cm | ~8 cm | ~20 cm / 8 in |
| Bulky | 5.5–6mm | ~9 cm | ~12 cm | ~30 cm / 12 in |
Tips for a Great Finish
Stuff the Plates Firmly
Weight plates should feel solid and hold their disc shape without collapsing. Understuffed plates look droopy and round rather than flat. Add stuffing generously and press it toward the outer edges as you close up the final rounds.
Use the Invisible Decrease
Standard sc2tog creates a visible bump on the outside of the piece. The invisible decrease (worked through front loops only) gives a much cleaner look, especially on pieces worked in gray or dark colors where every stitch is visible.
Keep Bar Tension Consistent
Because the bar is just 6 stitches in a tube with no shaping, tension inconsistency is very obvious. Try to maintain the same hook angle and yarn tension throughout. If you notice the tube widening or narrowing, adjust grip pressure rather than trying to compensate in the stitches.
Sew Plates Straight
Make sure each plate is perpendicular to the bar — not tilted. Lay the assembled dumbbell on a flat surface and check from multiple angles before completing the seam on the second plate. A crooked plate is the most common finishing issue with this pattern.
Weave In Ends Thoroughly
All your ends live inside the stuffed pieces, so weave them in multiple directions for at least 10–12 stitches. This project gets handled a lot (people can’t resist picking it up) so secure ends matter.
Gift Ideas for the Fitness Lover in Your Life
The crochet dumbbell shines as a gift. Here’s how to make it feel extra special.
- The gym starter kit: Pair with a small hand towel, a packet of electrolyte drink mix, and a motivational card. Put everything in a white mesh bag — it looks effortlessly put together.
- The desk buddy: Wrap the dumbbell in tissue and tuck a note inside: “For the days when the actual gym is too far.” Instant hit.
- The personal record gift: Make a tag with the recipient’s best lift or running time. “She squatted 100kg. So we made her this.” Very specific, very thoughtful.
- The gym teacher gift: A set of two mini dumbbells in the school colors is a creative alternative to another mug or gift card.
- The baby shower gym gift: For the fitness-obsessed new parent, a soft crocheted dumbbell in baby-safe colors (using organic cotton stuffed with eco polyfill) is genuinely clever.
Common Mistakes and How to Fix Them
The Plates Don’t Match in Size
This usually happens when tension shifts between the first and second plate. Make both plates back to back in the same sitting if possible. If they’ve come out slightly different sizes, the larger one can be blocked to bring it closer in size — wet, reshape, and let dry flat.
The Bar Is Too Long or Too Short
The bar length determines how realistic the proportions look. A too-long bar looks like a barbell; a too-short bar looks like a yo-yo. Count your rounds carefully — 13 additional rounds in worsted weight gives roughly the right proportions for a desk dumbbell.
The Seam Between Bar and Plate Is Visible
This is a technique issue, not a pattern issue. Make sure you’re sewing through corresponding stitches on both pieces and pulling the thread tight enough to pull the pieces flush together. If the seam is showing on the outside, run your needle back through a second time and pull tighter before fastening off.
The Stuffing Is Lumpy
Lumpy stuffing is usually from adding too much at once. Add stuffing in small amounts, pressing and shaping with your fingers between each addition. For the plates, press the stuffing flat rather than into a ball — this maintains the disc shape.
Frequently Asked Questions
Is this crochet dumbbell pattern really free?
Yes, the complete pattern in this post is entirely free. You can use it for personal projects, gifts, and even to sell finished items at craft markets. No purchase required.
What yarn weight is best for this pattern?
Worsted weight is the most beginner-friendly choice — the stitches are easy to see, the project works up quickly, and the finished size is ideal for desk decor or gifting. DK weight gives a slightly smaller, more refined result. Both work beautifully.
Can I sell items made from this free crochet dumbbell pattern?
Yes. This is a free pattern you can use to make items for sale in your shop, at craft fairs, or on Etsy. We’d love it if you mentioned where you found the pattern — but it’s not required.
How do I make it look more realistic?
The biggest impact comes from the accent ring detail sewn onto each plate — it immediately reads as a weight plate to anyone who’s ever been in a gym. You can also add small stitched lines radiating from the center using black yarn to suggest the grip texture of a real dumbbell plate.
Can I make this as a cat toy?
Absolutely — the shape is irresistible to cats and the size is perfect. Use a firm cotton yarn for durability, stuff firmly so it can’t be bitten into easily, and make sure all yarn ends are securely woven in. Skip the accent rings or sew them very firmly if you’re making it for a cat.
How long does this project take?
Most crocheters finish a complete dumbbell in 2–4 hours. The two plates take the most time; the bar goes quickly. It’s a great one-evening project.
Can a beginner make this?
If you can single crochet and work in the round, yes. The pattern doesn’t use any complex stitches — it’s all single crochet with standard amigurumi shaping (increases and decreases). The assembly requires some patience but no advanced technique.
Final Thoughts
There’s a special kind of joy that comes from a project people genuinely don’t expect. A crocheted dumbbell does exactly that — it surprises people, makes them laugh, and then makes them think “that’s actually really well made.”
It uses almost no yarn, it takes less than an afternoon, and the end result is something truly original. Whether it ends up on a desk, in a gift bag, or batting around on a living room floor, this little project punches above its weight (pun fully intended).
Give it a try and let us know how it goes. Drop a comment below with your finished project — we’d genuinely love to see your version.
Happy crocheting. ✨


Reader discussion
Reader Comments
Tried this pattern? Share what worked, ask a question, or help another crocheter.
Your turn
Comments are moderated to keep the discussion useful and family-friendly. Please do not post personal information.