
Crochet Dragon Pattern — Free Step-by-Step Guide for All Skill Levels
Make your own adorable stuffed dragon from scratch — complete with wings, horns, and a free beginner-friendly pattern
A crochet dragon pattern is one of the most magical projects you can make — and it’s far more beginner-friendly than most people expect. In fact, the first time I made a crochet dragon, I was absolutely convinced it was going to be way too hard. However, once I understood the basic amigurumi structure, it clicked almost immediately. Consequently, I was hooked — and I’ve made dozens of crocheted dragons since then. Furthermore, this guide covers everything you need to know to make your very own crochet dragon, whether you’re a complete beginner or an experienced crocheter looking for a fun new challenge. Therefore, let’s dive in! 🐉
In this guide, you’ll find a free crochet dragon pattern with step-by-step instructions, a complete color guide, assembly tips, and answers to every question beginners ask. Additionally, I’ve included pattern variations so you can customize your dragon however you like — from tiny pocket dragons to large, dramatic statement pieces.
📋 What’s in this guide
- Why crochet dragon patterns are so popular right now
- Skill levels — which crochet dragon pattern is right for you?
- Supplies you need to make a crochet dragon
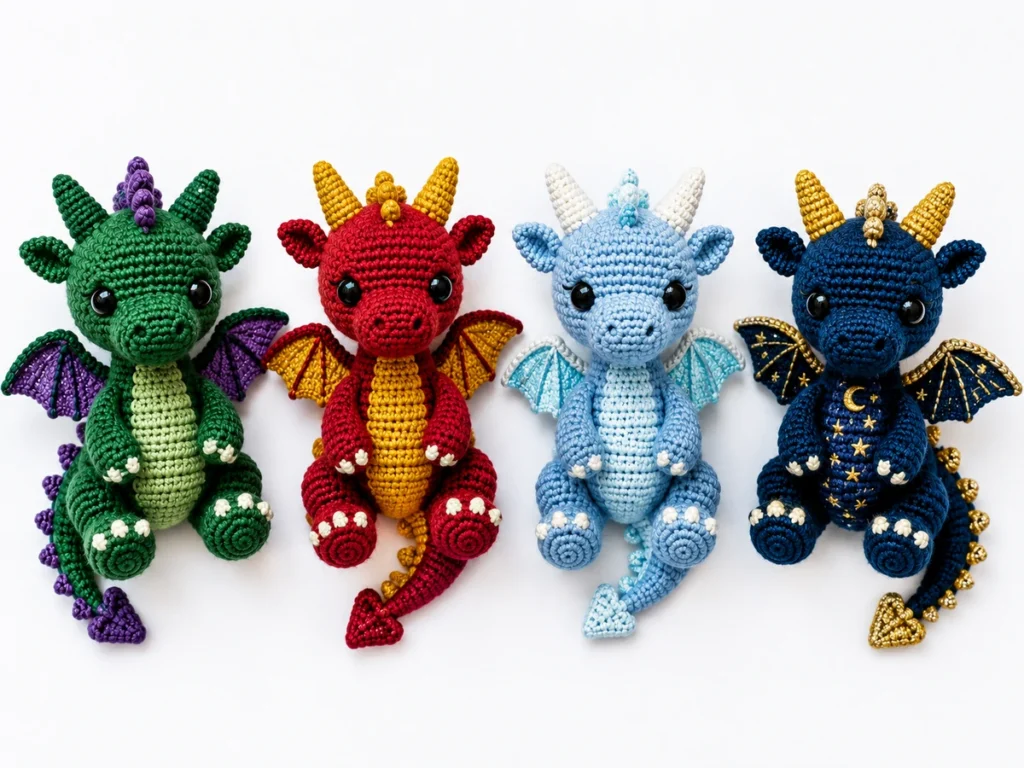
- Color guide — classic and creative dragon color combinations
- Free pattern: The Beginner Crochet Dragon (step-by-step)
- How to assemble your crochet dragon
- Tips for making dragon wings, horns, and spines
- Frequently asked questions
1. Why Crochet Dragon Patterns Are So Popular Right Now
It’s no surprise that the crochet dragon pattern has become one of the most searched crochet projects in 2026. In fact, dragon-themed crafts have seen enormous growth across every platform — from Pinterest boards to TikTok crochet videos. Moreover, the rise of fantasy content, gaming, and shows like House of the Dragon has fueled an incredible surge in dragon-themed handmade items.
Who Makes Crochet Dragon Patterns?
Interestingly, crochet dragons appeal to a remarkably wide audience. For example, parents make them as toys for kids who love fantasy. Additionally, gamers commission them as desk companions. Teens make them as gifts for friends who love anime. Furthermore, experienced crafters enjoy them as display pieces. As a result, a crocheted dragon makes one of the most universally loved handmade gifts you can give.
“A crochet dragon is not just a toy — it’s a tiny mythical creature brought to life with yarn and a hook. And there’s nothing quite like the look on someone’s face when they receive one.”
According to search trend data, searches for “crochet dragon pattern” have increased by over 200% since 2023. Furthermore, dragon amigurumi consistently ranks among the top 10 most favorited patterns on Ravelry and Etsy every single year.
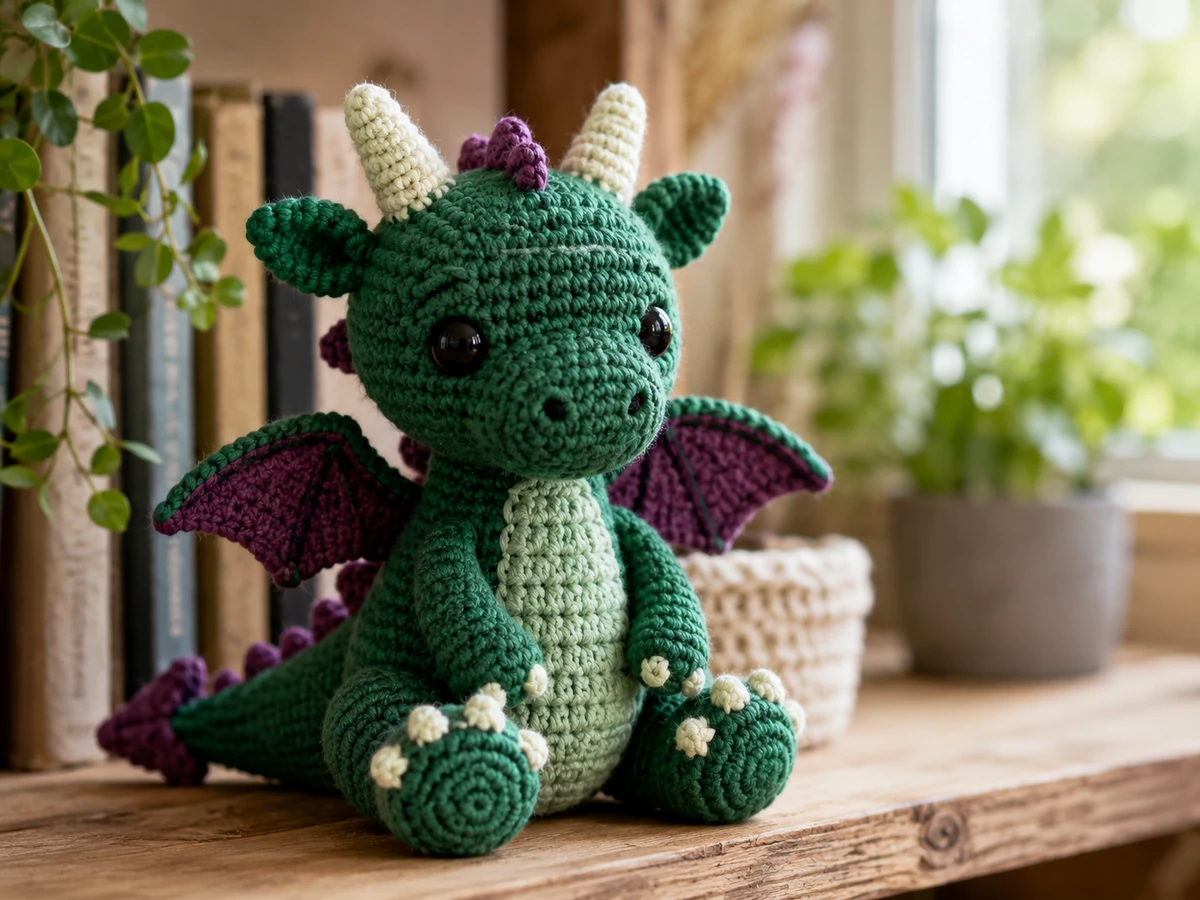
A finished beginner crochet dragon pattern — emerald green body, tiny purple wings, and the cutest safety eyes you’ve ever seen.
2. Skill Levels — Which Crochet Dragon Pattern Is Right for You?
One of the most important things to understand is that there isn’t just one type of crochet dragon pattern. In fact, dragon patterns exist for every skill level — from very simple two-part beginner designs all the way to incredibly detailed sculptural dragons. Therefore, choosing the right level is crucial for an enjoyable experience.
Mini Pocket Dragon
Under 15cm tall. Simple round body, no complex shaping. However, still has all the charm of a full-size dragon. Perfect for a first attempt.
Boxy Dragon Amigurumi
Basic cylinder and sphere shapes assembled together. Consequently, this is the most forgiving pattern type — great for understanding amigurumi structure.
Classic Fantasy Dragon
Full body with shaped head, separate wings, horns, and spines. Additionally includes a detailed tail and textured belly scales.
Dragon with Movable Parts
Articulated jaw, poseable wings with wire frames. Furthermore, the tail is wired so it can be curled in different positions.
Life-Size Dragon Display
Large sculptural piece, 50cm or more. Complex color work, scale texture, dramatic pose. In contrast to beginner versions, this is a weeks-long project.
Dragon Wearable (Hat/Bag)
Dragon styled as a hat, backpack, or bag. Requires understanding both garment construction and amigurumi techniques simultaneously.
If this is your first crochet dragon pattern, start with the Mini Pocket Dragon or the Boxy Dragon Amigurumi. Both use only single crochet, increases, and decreases — consequently, they’re perfect for learning the magic ring and basic amigurumi shaping. Furthermore, our free pattern in Section 5 below is exactly this beginner level. In addition, you can check out our complete amigurumi beginner guide for a full introduction to the technique.
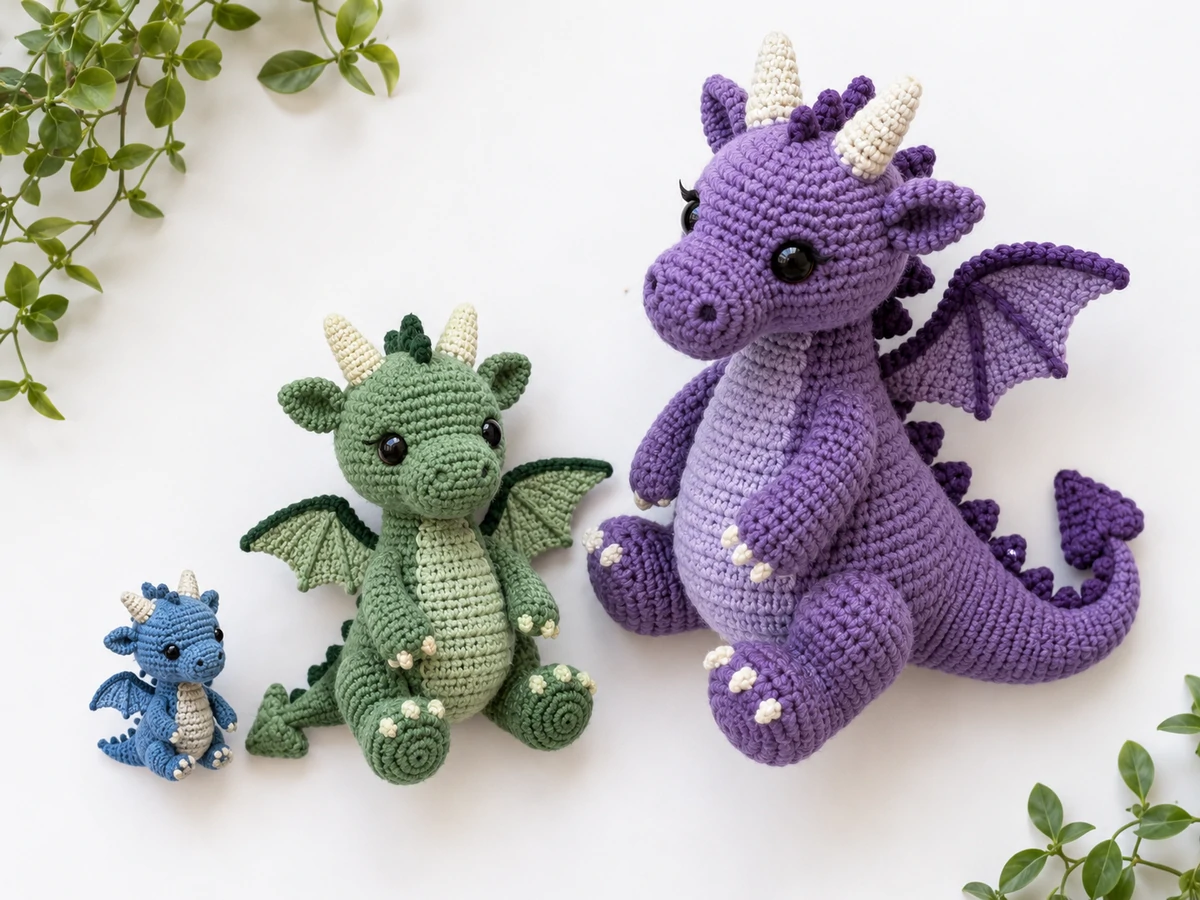
Three different crochet dragon pattern sizes — from a tiny pocket companion to a dramatic display piece.
3. Supplies You Need to Make a Crochet Dragon Pattern
Before you begin your crochet dragon pattern, gathering the right supplies will make the entire process much smoother. Furthermore, most of these items are inexpensive and easy to find at any craft store.
Essential Supplies
Best Yarn for Crochet Dragon Patterns
For most dragon amigurumi, DK weight (size 3) or worsted weight (size 4) yarn works best. Specifically, look for yarn with good stitch definition — smooth acrylic like Caron Simply Soft or Lion Brand Vanna’s Choice is ideal. Additionally, you’ll need at least 2–3 colors: one for the main body, one for the belly/underside, and one for the wings or details. Avoid fuzzy or textured yarn because it makes it very hard to see your stitches.
Crochet Hook Size for Dragon Amigurumi
For DK weight yarn, use a 3mm or 3.5mm hook. For worsted weight, use a 3.5mm or 4mm hook. Importantly, go one size smaller than the yarn’s recommended hook — this creates a tighter fabric that keeps the stuffing from showing through. Consequently, your finished dragon will look much more polished and professional.
Everything Else You Need
Polyester fiberfill stuffing — enough to firmly stuff the body, head, and limbs. Safety eyes — 6mm or 9mm black safety eyes for a cute look, or 12mm for a more dramatic expression. Stitch markers — essential for marking the beginning of each round. Yarn needle — for sewing parts together and weaving in ends. Scissors. Optionally: wire armature for poseable wings or a curled tail.
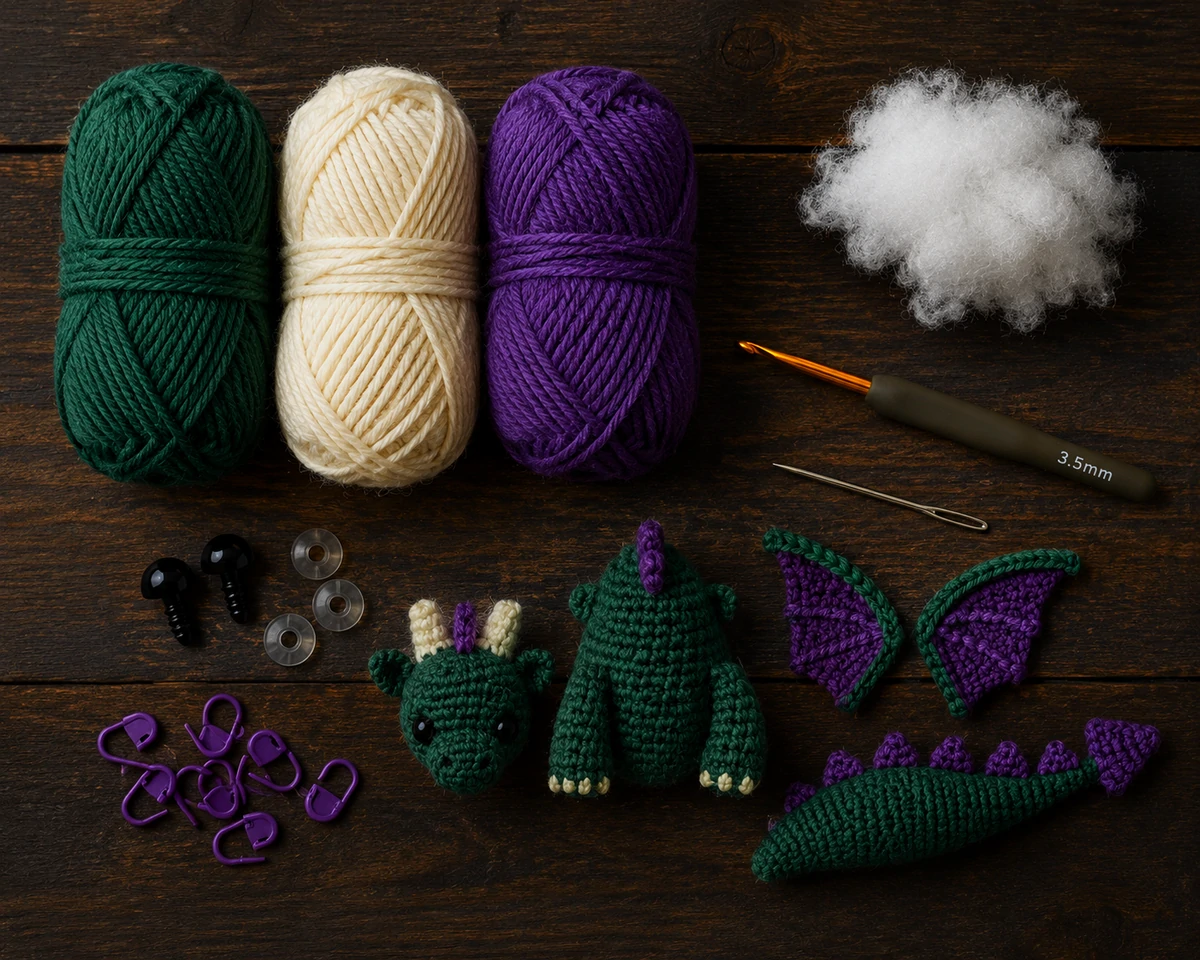
Everything you need to start your crochet dragon pattern — gather your supplies and let the magic begin!
4. Color Guide — Dragon Color Combinations That Look Amazing
One of the most exciting parts of any crochet dragon pattern is choosing the colors. Furthermore, the color combination you choose completely transforms the personality of your dragon. Therefore, here are the most popular and visually striking options:
Classic and Fantasy Color Pairings
| Dragon Type | Main Body Color | Belly Color | Wing / Detail Color |
|---|---|---|---|
| 🌿 Forest Dragon | Emerald Green | Cream / Ivory | Deep Purple |
| 🔥 Fire Dragon | Deep Red / Crimson | Orange / Gold | Black / Charcoal |
| ❄️ Ice Dragon | Pale Blue / White | Silver / Light Gray | Icy Blue / Turquoise |
| 🌙 Night Dragon | Deep Navy / Black | Dark Purple | Metallic Gold |
| 🌸 Pastel Dragon | Lavender / Soft Pink | Pale Yellow | Mint Green / Peach |
| 🌈 Rainbow Dragon | Gradient (self-striping yarn) | White | Matching gradient |
For the most visually dramatic result, choose colors that are at least 2–3 shades apart in value (light vs. dark). Consequently, the belly, wings, and details will stand out beautifully against the main body. Furthermore, metallic or shimmer yarn for the wings adds an incredible magical quality to any crochet dragon pattern.
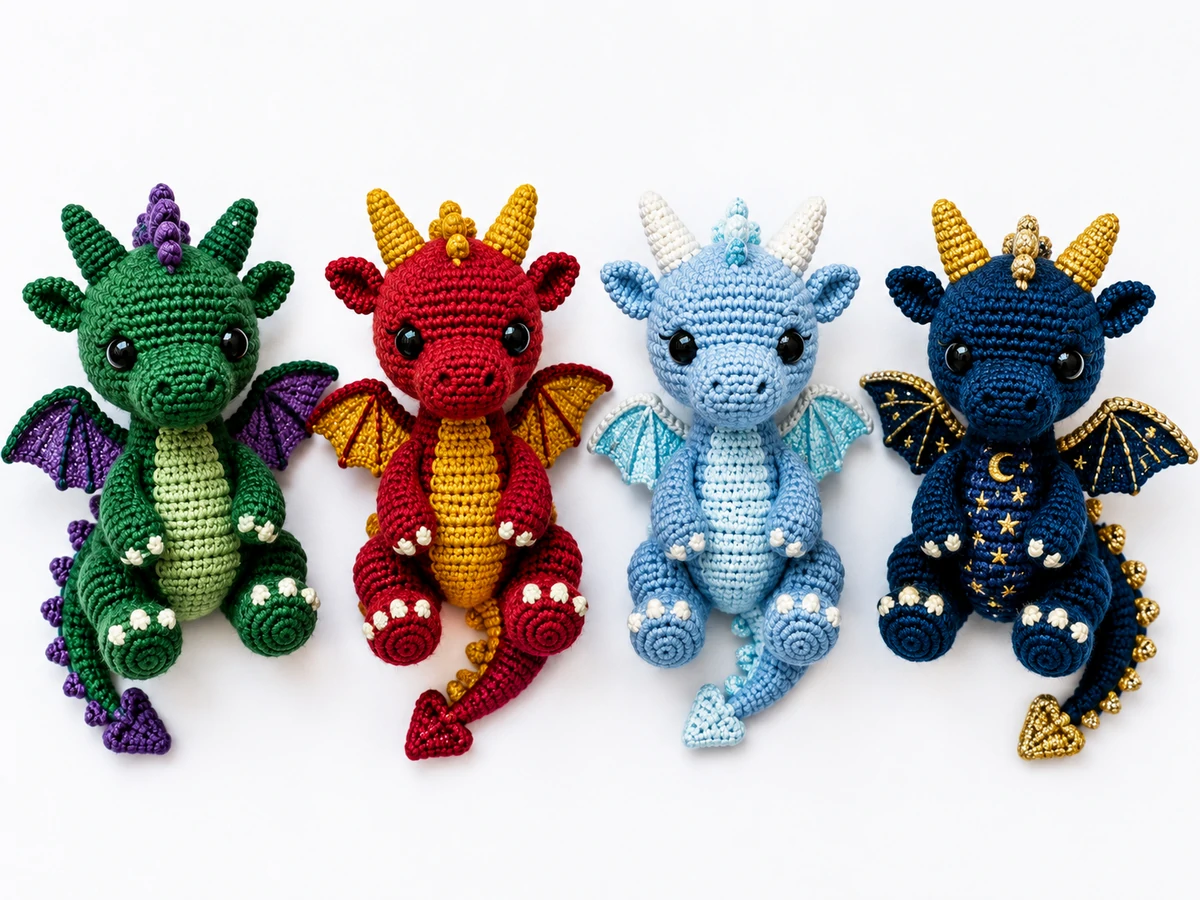
Four stunning color combinations — from the classic forest dragon to the dramatic night dragon. Which one will you make first?
5. Free Crochet Dragon Pattern: The Beginner Pocket Dragon 🐉
This free crochet dragon pattern is specifically designed for beginners. Consequently, it uses only single crochet, magic ring, increases, and decreases — the fundamental amigurumi techniques. Furthermore, the finished dragon stands approximately 12cm tall and takes about 3–5 hours to complete. In addition, it uses only two colors and makes a wonderfully charming gift for any age.
Before you begin, make sure you’re comfortable with the magic ring and single crochet stitch. If not, our beginner amigurumi guide will walk you through both techniques with step-by-step photos.
🐉 The Beginner Pocket Dragon — Free Crochet Pattern
Materials
- DK yarn — Main color (MC): green
- DK yarn — Contrast color (CC): cream
- 3.5mm crochet hook
- Polyester fiberfill stuffing
- 2 × 9mm black safety eyes
- Stitch markers + yarn needle
Abbreviations
- MR = magic ring
- sc = single crochet
- inc = increase (2 sc in 1 st)
- dec = decrease (2 sc tog)
- BLO = back loop only
- sl st = slip stitch
- FO = fasten off
Dragon Parts
- 🟢 Head × 1
- 🟢 Body × 1
- 🟢 Legs × 4
- 🟢 Arms × 2
- 🟢 Tail × 1
- 🟣 Wings × 2
- ⚪ Belly panel × 1
Head
Rounds 1–14
Stuffed firmly
Body
Rounds 1–16
Stuffed firmly
Legs × 4
Rounds 1–8
Lightly stuffed
Wings × 2
Flat piece
CC yarn
Tail
Long taper
Rounds 1–20
Belly
Oval shape
CC yarn
HEAD (MC): MR, 6 sc. R2: inc×6 = 12. R3: (sc, inc)×6 = 18. R4: (sc×2, inc)×6 = 24. R5-8: sc×24. R9: (sc×2, dec)×6 = 18. Insert safety eyes between R5-6, approx 7 sts apart. R10: (sc, dec)×6 = 12. Stuff firmly. R11: dec×6 = 6. FO, close opening, leave long tail for sewing.
BODY (MC): MR, 6 sc. R2: inc×6 = 12. R3: (sc, inc)×6 = 18. R4: (sc×2, inc)×6 = 24. R5-6: sc×24. R7: (sc×2, dec)×6 = 18. R8-12: sc×18. R13: (sc, dec)×6 = 12. Stuff firmly before closing. R14: dec×6 = 6. FO, leave long tail.
LEGS × 4 (MC): MR, 6 sc. R2: inc×6 = 12. R3-4: sc×12. R5: BLO sc×12 (creates foot ridge). R6-8: sc×12. FO, leave long tail. Lightly stuff each leg before sewing closed.
ARMS × 2 (MC): MR, 6 sc. R2: inc×6 = 12. R3-6: sc×12. R7: dec×6 = 6. FO, leave long tail. Leave arms mostly unstuffed so they hang naturally.
TAIL (MC): MR, 4 sc. R2: sc×4. R3: (sc, inc)×2 = 6. R4-5: sc×6. R6: (sc×2, inc)×2 = 8. R7-9: sc×8. R10: (sc×3, inc)×2 = 10. R11-13: sc×10. R14: (sc×4, inc)×2 = 12. R15-18: sc×12. FO, leave long tail. Do not stuff.
WINGS × 2 (CC): Ch 10. R1: sc in 2nd ch from hook, sc×6, 3 sc in last ch. Continue along other side: sc×7. R2: ch1, turn, sc×7, 3 sc in corner, sc×7 = 17. R3-4: repeat R2 pattern, increasing at corner each row. FO, leave long tail. Block flat if needed.
BELLY PANEL (CC): Ch 5. R1: sc in 2nd ch from hook, sc×3 = 4. R2-8: ch1, turn, sc×4. R9: ch1, dec, sc×2 = 3. R10: ch1, sc×3. R11: ch1, dec, sc×1 = 2. R12: ch1, dec = 1. FO, leave long tail.
HORNS × 2 (MC, optional): MR, 4 sc. R2: sc×4. R3: (sc, inc)×2 = 6. R4: sc×6. FO, leave tail. Do not stuff — they’ll stay pointy on their own!
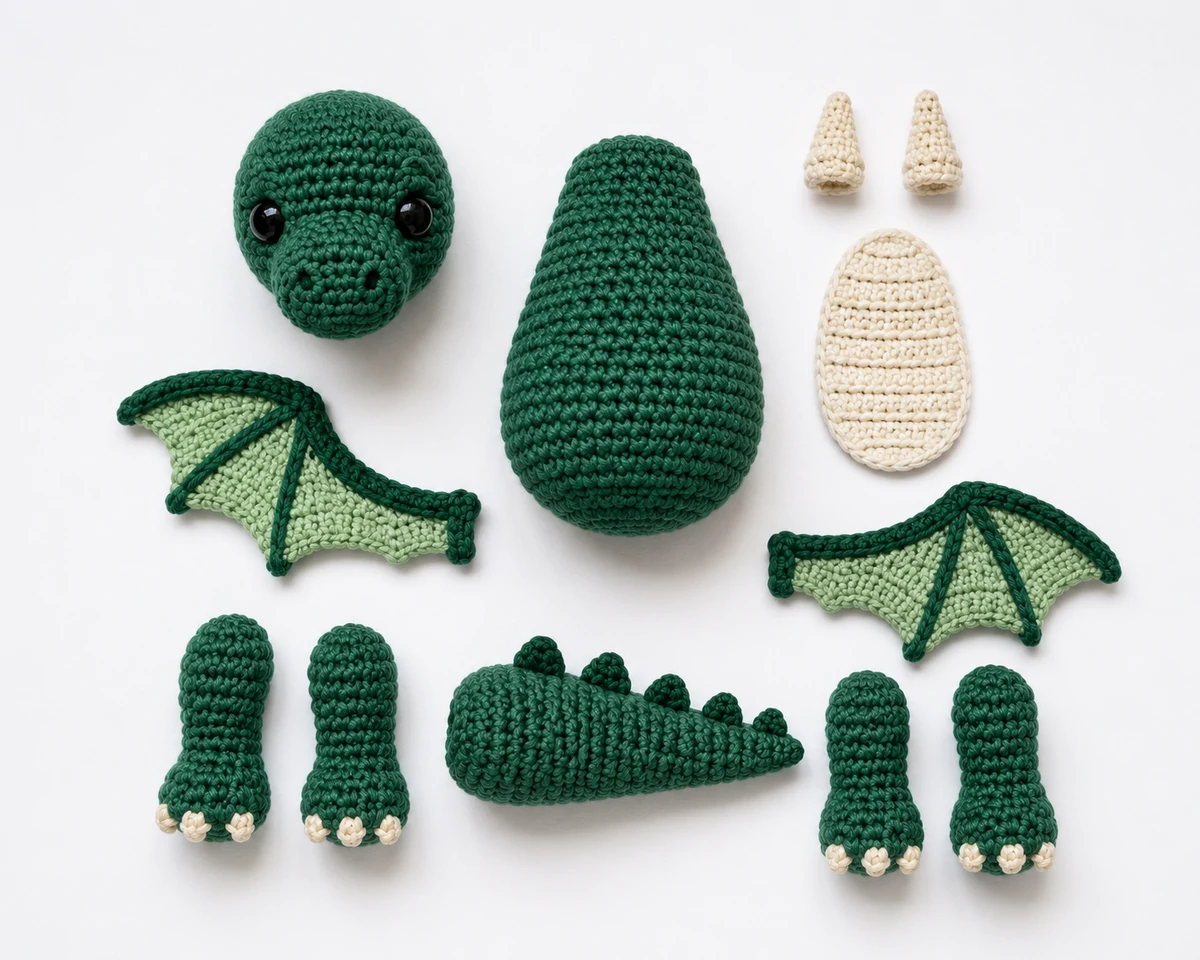
All the pieces of the crochet dragon pattern laid out before assembly — this is the most satisfying moment before it all comes together!
6. How to Assemble Your Crochet Dragon Pattern
Assembly is often the most intimidating part of any crochet dragon pattern. However, with a careful approach and a good yarn needle, it’s actually quite straightforward. Furthermore, the assembly order matters — therefore, follow these steps exactly for the best result.
Step-by-Step Assembly Order
Attach the Belly Panel First
Before assembling anything else, sew the cream belly panel to the front of the body. Specifically, center it on the front and use a whip stitch around the edges. Consequently, this is much easier to do while the body is still open and unattached to the head.
Sew the Head to the Body
Align the head with the top of the body. Using your yarn needle and a length of MC yarn, sew in a circle through both pieces. Additionally, make sure the face is pointing forward and the seam is hidden as much as possible. Pull the yarn snug as you go to keep the join firm.
Attach the Legs
Pin all four legs in position before sewing. Place the front legs roughly at the R4-5 area of the body, and the back legs at R11-12. Furthermore, make sure all four legs touch the ground evenly so the dragon sits flat. Sew each leg firmly in a circle through the body.
Attach the Arms, Wings, Tail, and Horns
Sew the arms to the upper body sides, just below the head join. Subsequently, attach the wings to the upper back, angled slightly upward for a natural look. Then sew the tail at the bottom back of the body, pointing slightly downward. Finally, sew the horns to the top of the head, spaced evenly.
7. Tips for Making Dragon Wings, Horns, and Spines
The details are what truly bring a crochet dragon pattern to life. In fact, getting the wings, horns, and spines right makes the difference between a basic stuffed animal and a truly magical creature. Therefore, here are the most important tips for each feature:
Making Dramatic Wings
How to Get Wings That Actually Stand Up
For wings that hold their shape, insert a piece of floral wire or pipe cleaner along the outer edge before finishing. Consequently, you can bend and pose the wings any way you like. Additionally, blocking the wings flat before attaching them gives them a much neater, more dramatic silhouette. Furthermore, using a slightly stiffer yarn (like cotton) for wings makes them hold their shape better even without wire.
Horns and Spines That Stay Pointy
Keeping Horns Firm and Pointy
The key to firm, pointy horns is crocheting with tight tension using a smaller hook than recommended. Therefore, a 2.5mm hook for DK yarn creates beautifully stiff horns that don’t need stuffing. Additionally, you can insert a tiny piece of pipe cleaner inside each horn if you want extra stiffness. Furthermore, working in a tight spiral (rather than joining rounds) helps create that clean cone shape.
Adding Belly Scales and Texture
Creating Scale Texture on Your Dragon
For a scaly texture on the body, you can work back loop only (BLO) rounds throughout the body — this creates a subtle ribbed effect that reads beautifully as scales. Alternatively, you can embroider small V-shapes along the back and sides after assembly. As a result, your dragon will have a much more detailed, realistic appearance without requiring any complex stitchwork.
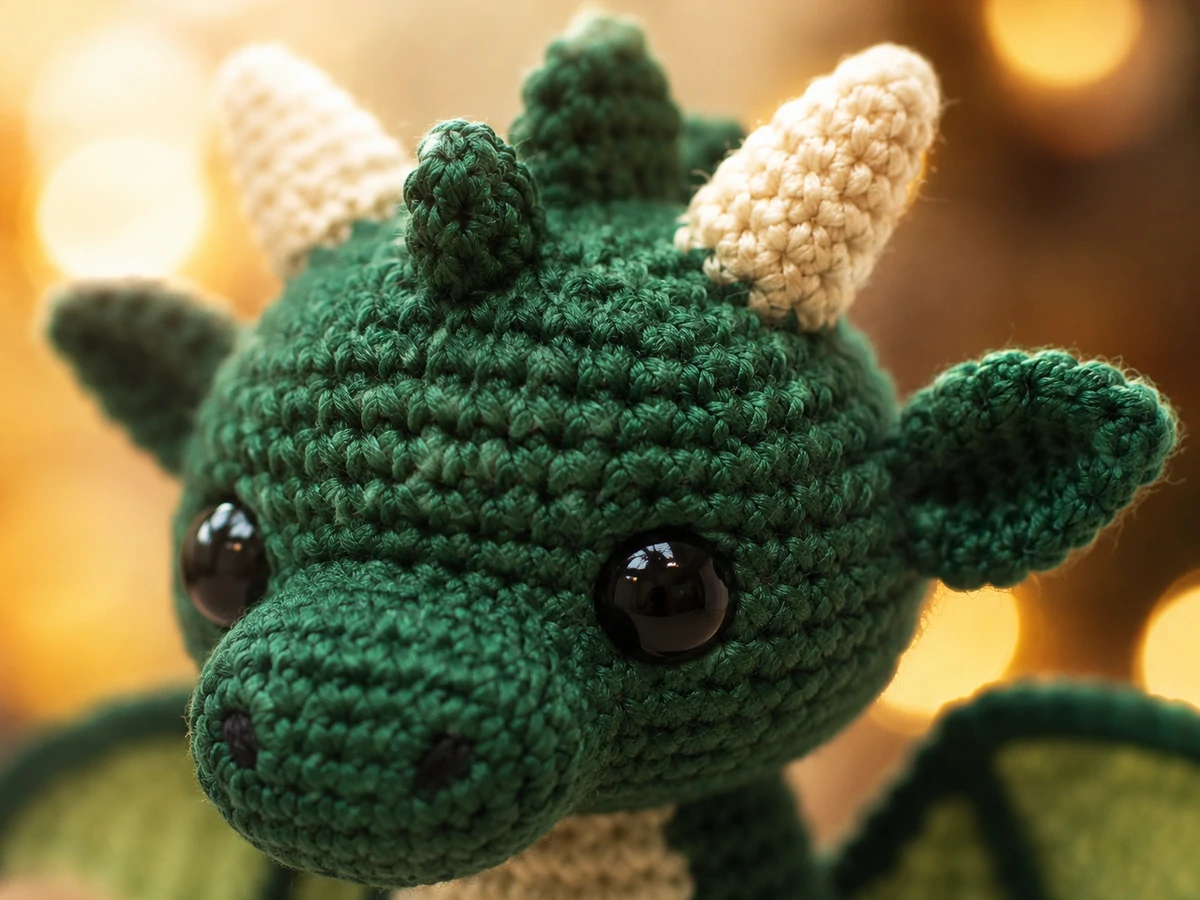
The details are everything — safety eyes, tiny horns, and neat stitches make this crochet dragon pattern truly come alive.
8. Frequently Asked Questions About Crochet Dragon Patterns
Is a crochet dragon pattern hard to make for beginners?
Not at all! In fact, beginner crochet dragon patterns like our free Pocket Dragon above use only single crochet, increases, and decreases — the same basic techniques used in any amigurumi project. However, they do require patience during the assembly stage. Therefore, if you’ve made at least one other amigurumi before, you’re ready to make a dragon. If not, practice with a simple ball or small animal first.
How long does it take to crochet a dragon?
A beginner pocket dragon like our free pattern takes approximately 3–5 hours of crochet time, plus 1–2 hours for assembly. However, a medium-size dragon with detailed wings and spines typically takes 8–12 hours. In contrast, a large advanced display dragon can take 20+ hours. Consequently, most beginners spread the project over 2–3 evenings.
What yarn is best for a crochet dragon pattern?
The best yarn for a crochet dragon pattern is smooth DK or worsted weight acrylic in a solid color. Specifically, Lion Brand Vanna’s Choice, Caron Simply Soft, or WeCrochet Palette are all excellent choices. Additionally, for the wings, you can use a slightly stiffer cotton yarn or a metallic/shimmer yarn for a magical effect. Furthermore, always use one hook size smaller than the yarn label recommends to create a tighter fabric that hides the stuffing.
How do I make my crochet dragon’s wings stay up?
There are several effective methods. First, you can insert pipe cleaners or floral wire along the outer edge of each wing before attaching them. Second, blocking the wings with starch spray helps them hold their shape without wire. Third, working the wings in a stiffer yarn like cotton naturally gives them more body. As a result, you can choose whichever method works best for your project.
Can I sell items made from a free crochet dragon pattern?
It depends on the specific pattern’s license. Moreover, many free patterns allow selling finished items as long as you credit the designer. However, some patterns (especially those sold on Etsy or Ravelry) restrict commercial use. Therefore, always check the pattern’s terms before selling. Additionally, if you’re using our free pattern above, you’re welcome to sell finished dragons — just credit the pattern source!
How much yarn do I need for a crochet dragon pattern?
For our beginner Pocket Dragon (approx. 12cm), you’ll need approximately 100–150 yards of MC yarn and 30–50 yards of CC yarn. However, for a larger intermediate dragon (20–25cm), expect to use 250–400 yards of main color. In any case, always buy slightly more than you think you need — running out of yarn mid-project is very frustrating, especially with specialty colors.
Ready to Make Your Own Crochet Dragon? 🐉
Grab your hook, choose your colors, and bring your mythical creature to life. You’ve absolutely got this!
Explore More Free Patterns →

Reader discussion
Reader Comments
Tried this pattern? Share what worked, ask a question, or help another crocheter.
Your turn
Comments are moderated to keep the discussion useful and family-friendly. Please do not post personal information.