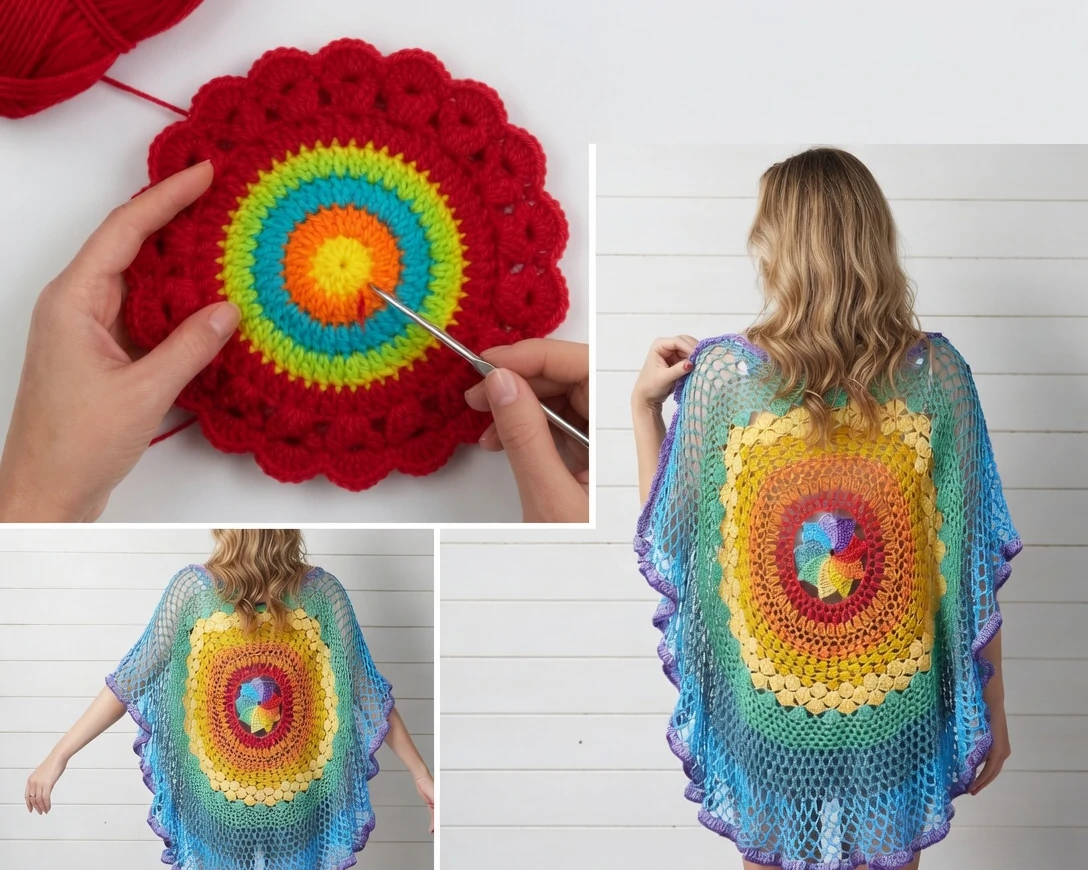
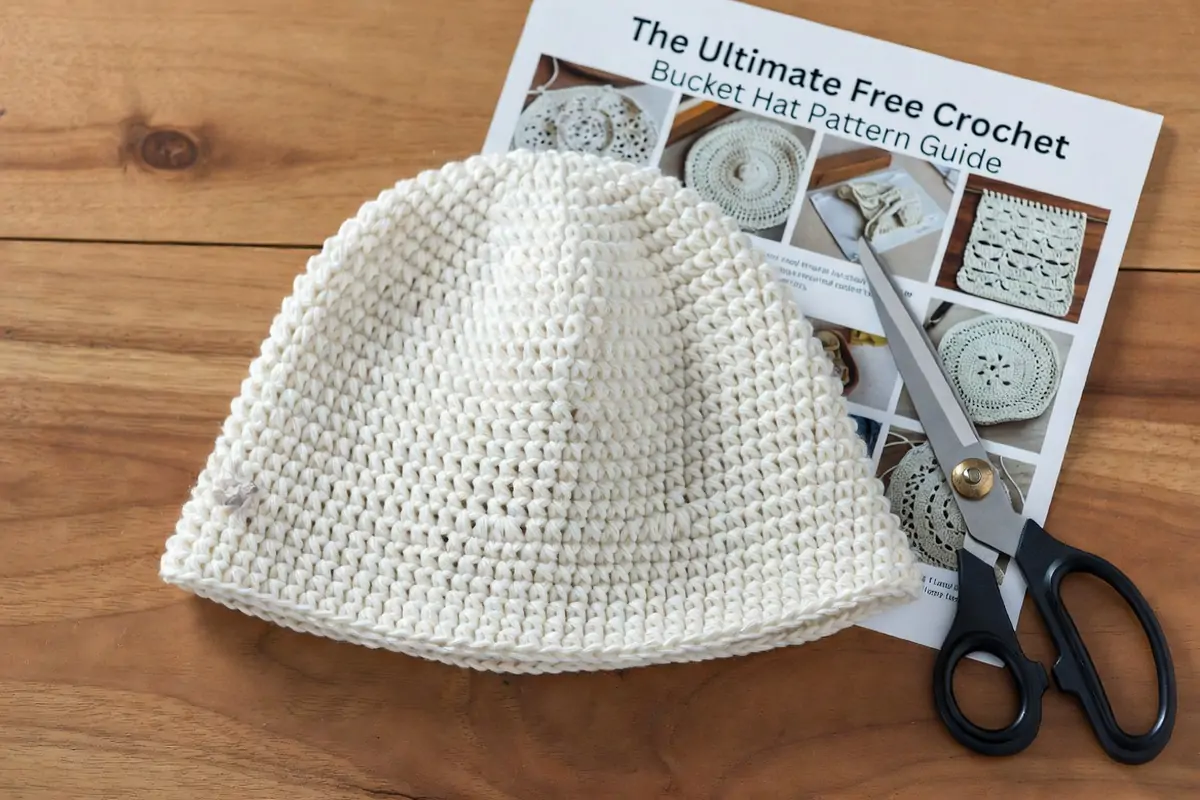
crochet bucket hat pattern A cozy, handmade vibe for crochet lovers who want style without spending a dime.
Hey there, fellow yarn addict! 🧶 If you’re anything like me, you’ve probably got a stash of cotton yarn begging to become something cute—and a free crochet bucket hat pattern is exactly what you need. Bucket hats are back in a big way, and crocheting your own means you get the perfect fit, the perfect color, and that unbeatable “I made this!” feeling.
In this guide, I’m walking you through everything: why these hats are trending, what materials actually work, and a complete, beginner-friendly pattern you can start today. No fancy skills required—just a hook, some yarn, and a little patience.
Why Crochet Bucket Hats Are Everywhere Right Now
Bucket hats aren’t just a ’90s throwback anymore. In 2026, they’re a legit fashion staple—from beach days to brunch runs. Here’s why crocheters are obsessed:
- Sun protection meets style: The brim keeps your face shaded without looking like you’re heading on safari .
- Beginner-friendly: Most patterns use basic stitches like single crochet (sc) and double crochet (dc). If you can make a circle, you can make a bucket hat .
- Customizable: Want a wide brim? A ruffled edge? A granny square vibe? There’s a pattern for that .
- Quick gratification: Many designs work up in just a few hours. Perfect for weekend projects .
What You’ll Need (The Real Essentials)
Before you dive in, grab these supplies. I’m keeping it simple—no weird gadgets required.
Table
| Item | Details |
|---|---|
| Yarn | Worsted-weight (size 4) cotton yarn. Cotton is breathable and holds its shape. Brands like Lily Sugar ‘n Cream or Bernat Handicrafter work great . |
| Hook | Size 7 (4.5mm) for most patterns . |
| Yarn needle | For weaving in ends. |
| Stitch markers | Super helpful for keeping track of rounds, especially on the brim . |
Pro tip: Cotton yarn is your best friend here. Acrylic gets hot and saggy in the sun. Trust me, I’ve learned the hard way.
The Pattern: Easy Crochet Bucket Hat (5 Sizes!)
This is a free crochet bucket hat pattern adapted from one of my favorite go-to designs. It includes sizes from baby to adult large, so you can make one for literally everyone
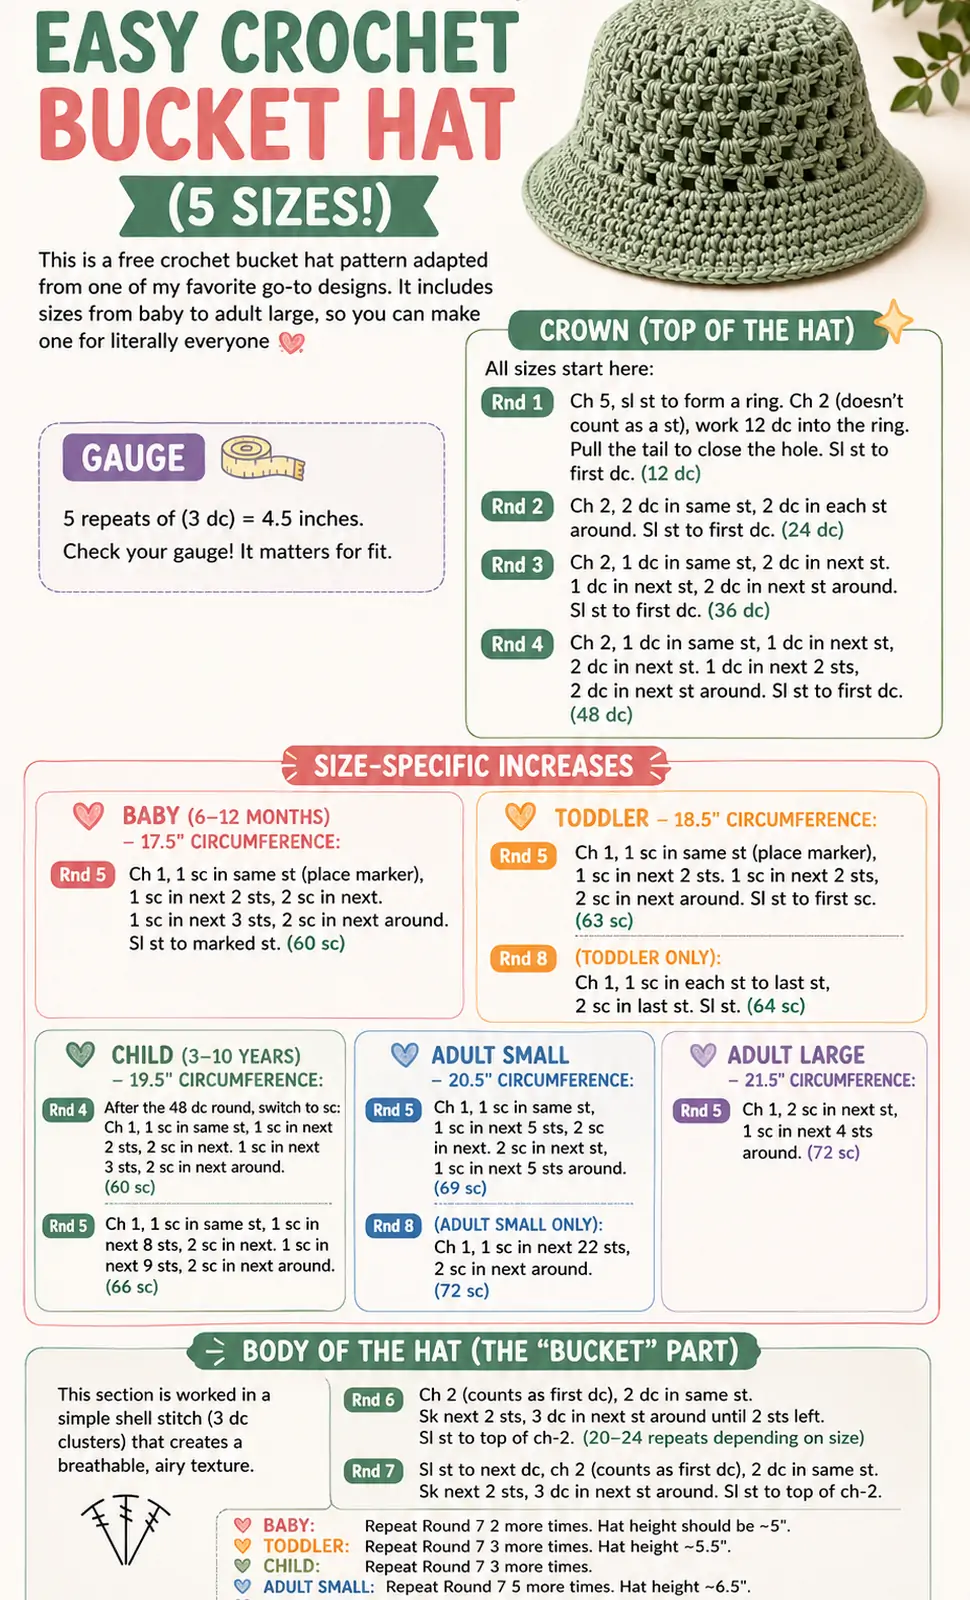
Gauge
5 repeats of (3 dc) = 4.5 inches. Check your gauge! It matters for fit.
Crown (Top of the Hat)
All sizes start here:
Round 1: Ch 5, sl st to form a ring. Ch 2 (doesn’t count as a st), work 12 dc into the ring. Pull the tail to close the hole. Sl st to first dc. (12 dc)
Round 2: Ch 2, 2 dc in same st, 2 dc in each st around. Sl st to first dc. (24 dc)
Round 3: Ch 2, 1 dc in same st, 2 dc in next st. 1 dc in next st, 2 dc in next st around. Sl st to first dc. (36 dc)
Round 4: Ch 2, 1 dc in same st, 1 dc in next st, 2 dc in next st. 1 dc in next 2 sts, 2 dc in next st around. Sl st to first dc. (48 dc)
Size-Specific Increases
Baby (6–12 months) – 17.5″ circumference:
- Round 5: Ch 1, 1 sc in same st (place marker), 1 sc in next 2 sts, 2 sc in next. 1 sc in next 3 sts, 2 sc in next around. Sl st to marked st. (60 sc)
Toddler – 18.5″ circumference:
- Round 5: Ch 1, 1 sc in same st (place marker), 1 sc in next 2 sts. 1 sc in next 2 sts, 2 sc in next around. Sl st to first sc. (63 sc)
- Round 8 (Toddler only): Ch 1, 1 sc in each st to last st, 2 sc in last st. Sl st. (64 sc)
Child (3–10 years) – 19.5″ circumference:
- Round 4 (Child): After the 48 dc round, switch to sc: Ch 1, 1 sc in same st, 1 sc in next 2 sts, 2 sc in next. 1 sc in next 3 sts, 2 sc in next around. (60 sc)
- Round 5: Ch 1, 1 sc in same st, 1 sc in next 8 sts, 2 sc in next. 1 sc in next 9 sts, 2 sc in next around. (66 sc)
Adult Small – 20.5″ circumference:
- Round 5: Ch 1, 1 sc in same st, 1 sc in next 5 sts, 2 sc in next. 2 sc in next st, 1 sc in next 5 sts around. (69 sc)
Adult Large – 21.5″ circumference:
- Round 5: Ch 1, 2 sc in next st, 1 sc in next 4 sts around. (72 sc)
Body of the Hat (The “Bucket” Part)
This section is worked in a simple shell stitch (3 dc clusters) that creates a breathable, airy texture.
Round 6: Ch 2 (counts as first dc), 2 dc in same st. Sk next 2 sts, 3 dc in next st around until 2 sts left. Sl st to top of ch-2. (20–24 repeats depending on size)
Round 7: Sl st to next dc, ch 2 (counts as first dc), 2 dc in same st. Sk next 2 sts, 3 dc in next st around. Sl st to top of ch-2.
- Baby: Repeat Round 7 2 more times. Hat height should be ~5″.
- Toddler: Repeat Round 7 3 more times. Hat height ~5.5″.
- Child: Repeat Round 7 3 more times.
- Adult Small: Repeat Round 7 5 more times. Hat height ~6.5″.
- Adult Large: Repeat Round 7 5 more times.
Adult Small only – Round 8: Ch 1, 1 sc in next 22 sts, 2 sc in next around. (72 sc)
The Brim (Where the Magic Happens)
The brim is what makes a bucket hat a bucket hat. These increases are staggered so you don’t get that weird hexagon shape
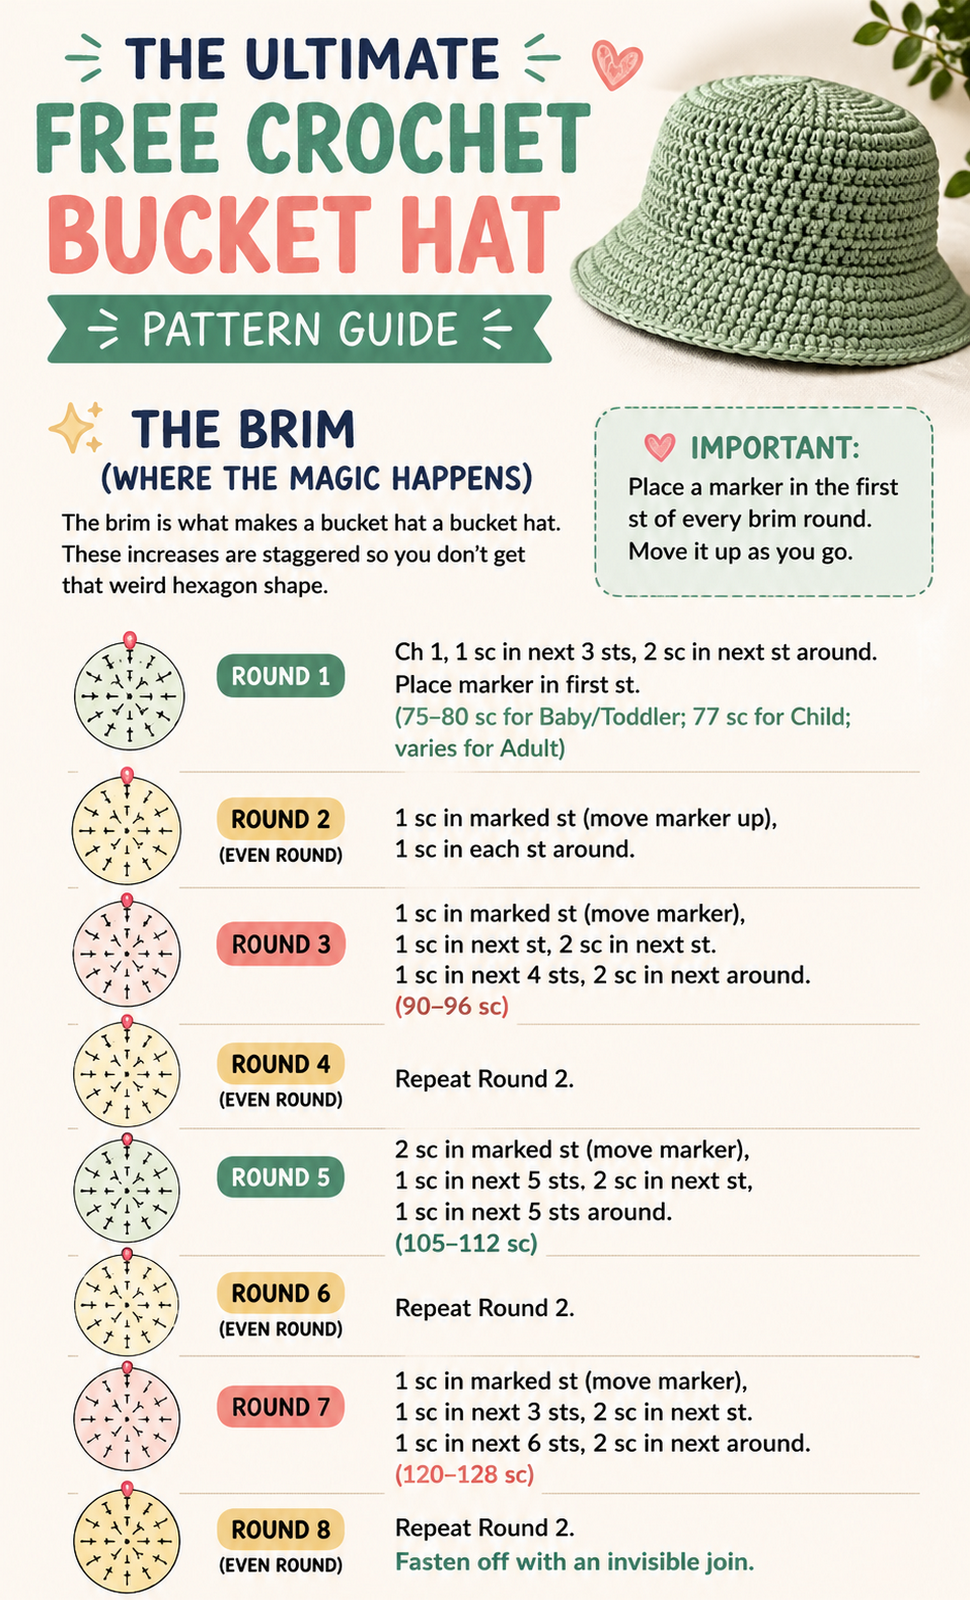
Important: Place a marker in the first st of every brim round. Move it up as you go.
Round 1: Ch 1, 1 sc in next 3 sts, 2 sc in next st around. Place marker in first st. (75–80 sc for Baby/Toddler; 77 sc for Child; varies for Adult)
Round 2 (Even round): 1 sc in marked st (move marker up), 1 sc in each st around.
Round 3: 1 sc in marked st (move marker), 1 sc in next st, 2 sc in next st. 1 sc in next 4 sts, 2 sc in next around. (90–96 sc)
Round 4: Repeat Round 2.
Round 5: 2 sc in marked st (move marker), 1 sc in next 5 sts. 2 sc in next st, 1 sc in next 5 sts around. (105–112 sc)
Round 6: Repeat Round 2.
Round 7: 1 sc in marked st (move marker), 1 sc in next 3 sts, 2 sc in next st. 1 sc in next 6 sts, 2 sc in next around. (120–128 sc)
Round 8: Repeat Round 2. Fasten off with an invisible join.
Toddler bonus: Add Rounds 9–10 for a wider brim if desired.
Finishing Touches
- Weave in all ends using your yarn needle.
- Block lightly if needed to shape the brim.
- Add a cute flower, bow, or embroidered detail if you’re feeling fancy .
Beginner Tips (From Someone Who’s Messed Up a Lot)
- Count your stitches: It’s so easy to add an extra stitch at the end of a round. That beginning ch-2? Don’t work into it at the end .
- Use stitch markers: I cannot stress this enough. The brim increases get confusing without them.
- Don’t skip the gauge swatch: I know, I know—but a hat that’s too tight or too floppy is heartbreaking.
- Cotton yarn only: Seriously. Acrylic stretches and gets sweaty. Cotton keeps its structure and breathes .
More Free Patterns to Try
Once you’ve nailed this one, branch out! Here are some trending styles for 2026:
- Granny square bucket hats: Boho and colorful. Great for using up scraps .
- Reversible bucket hats: Two colors, double the thickness. Perfect for cooler days .
- Checkered bucket hats: Trendy and Instagram-worthy. Easier than they look!
- Faux fur bucket hats: For winter vibes. Super bulky yarn = super quick project .
Final Thoughts
Crocheting your own bucket hat is one of those projects that’s equal parts practical and fun. You get a handmade accessory that fits your head, matches your style, and costs way less than store-bought. Plus, there’s something meditative about working in rounds, watching the crown grow into a real hat.
So grab that hook, pick your favorite cotton yarn, and get stitching. And hey—if you mess up a round, just frog it and try again. We’ve all been there. Happy crocheting! 🧶✨