
Crochet Parandi Pattern — Free Step-by-Step Guide for Beginners
Make a traditional braided hair tassel from scratch — with a complete free pattern, tassel tips, and styling ideas
A crochet parandi pattern is one of the most rewarding accessory projects a crocheter can make. A parandi is a long braided tassel that is woven into a hair braid, and it has been part of Punjabi and North Indian tradition for generations, worn at weddings, festivals, and folk dances like Giddha and Bhangra. This free crochet parandi pattern is written for beginners, so you only need to know how to chain and single crochet to get started. Grab a few colors of thread, some tassels, and let’s make an accessory that turns heads at any celebration.
In this guide you will find the full free crochet parandi pattern, a supply list, step-by-step instructions, tassel and finishing tips, color ideas, and answers to common questions. This pattern works with cotton or silk-style thread, so you can match it to any outfit or occasion. If you want to brush up on your basic stitches first, take a look at our beginner crochet guide and our crochet stitch library before starting.
📋 What’s in this guide
- What is a parandi — and why crochet one?
- Supplies you need (simple and affordable!)
- Free crochet parandi pattern — step by step
- How to finish and attach the tassels
- Color combinations for every occasion
- How to wear and style your parandi
- Frequently asked questions
1. What Is a Parandi — and Why Crochet One?
A parandi is a long, decorative tassel made from thread or ribbon that is braided into the end of a hair plait. Traditionally it was hand-woven or hand-tasseled, but a crochet parandi pattern gives the same beautiful result using just a hook and thread, which makes it far quicker and easier to recreate at home. It is especially popular for weddings, bridal mehendi functions, and folk dance costumes, but many people now wear a simple parandi as an everyday hair accessory too.
Why This Style Works So Well
The core of a parandi is a long crocheted cord, usually made from a simple chain or a tight tube of single crochet stitches. This cord is what gets braided together with your hair. At the bottom of the cord, one or more thread tassels hang down, and the parandi is often finished with a decorative cap, beads, or small charms where the tassels meet the cord. The contrast between the neat cord and the loose, swinging tassel is what gives a parandi its signature movement.
Why Beginners Can Make This Crochet Parandi Pattern
This project only uses chain stitch and single crochet, so there is no complicated shaping involved. The main skill is patience, since the cord needs to be long enough to braid comfortably, usually between 20 and 36 inches depending on how it will be worn. Once the cord is done, making the tassels is quick, and the whole project can usually be finished in one sitting.
Crochet parandi patterns have grown in popularity because they let makers customize a traditional accessory in any color combination to match modern outfits, lehengas, or everyday braids. They are also a favorite gift for wedding season and festival season, since a handmade parandi feels personal in a way a store-bought one often does not.
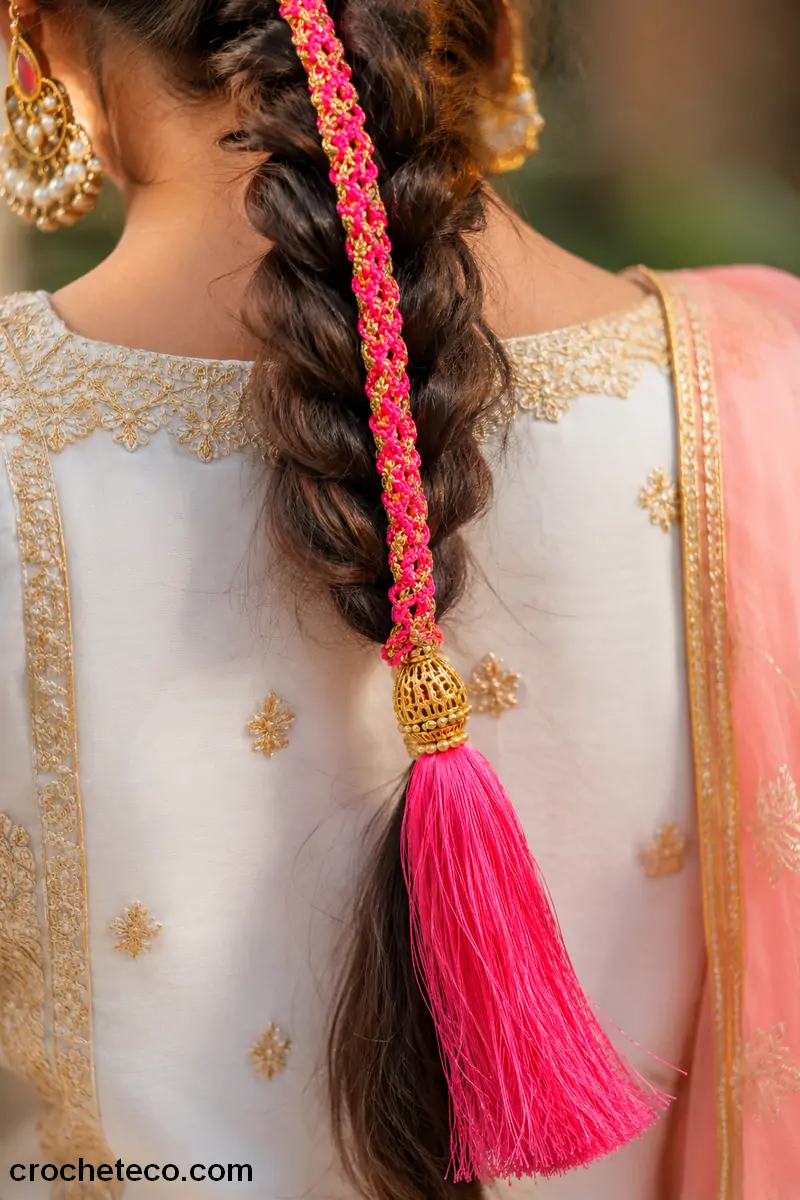
A finished crochet parandi pattern — a long braided cord with tassels, ready to be woven into a hair plait.
2. Supplies for the Crochet Parandi Pattern
One of the best things about a crochet parandi pattern is how few supplies it needs. Most of the cost goes into thread and tassels, both of which are inexpensive and widely available at craft or fabric stores.
What You Need
Thread or Yarn
Embroidery floss, crochet cotton thread, or a fine silk-style rayon thread in your chosen colors. You will need roughly 40–70 yards per parandi depending on length.
Crochet Hook
A small hook, typically 2mm to 3.5mm, matched to your thread weight. A smaller hook keeps the cord tight and neat so it braids smoothly with hair.
Scissors
Sharp scissors for trimming thread ends and cutting even tassel lengths.
Yarn or Tapestry Needle
For weaving in ends and securing tassels neatly at the base of the cord.
Small Ring or Cap Bead
A decorative bead or small metal cap to cover the point where the cord meets the tassels, giving a polished, finished look.
Beads or Charms (Optional)
Small beads threaded along the tassel strands add sparkle and gentle movement, especially nice for bridal or festival parandis.
For the most authentic parandi look, choose a rayon or silk-finish thread rather than plain cotton. The slight sheen catches light beautifully when the parandi swings with the braid. If you want a sturdier, everyday version, cotton crochet thread works well too and holds up better to daily wear.
3. Free Crochet Parandi Pattern — Complete Instructions
This free crochet parandi pattern creates a finished cord approximately 24–30 inches long, plus a tassel section, using only chain stitch and single crochet worked into a tight tube. The tight single crochet tube keeps the cord firm enough to braid smoothly with hair, while staying flexible enough to move naturally.
Pattern Notes — Read Before You Begin
🪢 The Classic Parandi — Free Crochet Pattern
Materials
- Fine crochet thread — 2–3 colors
- 2.5mm steel or small hook
- Scissors + tapestry needle
- 1 decorative cap bead
- Optional: small beads for tassel ends
Finished Size
- Cord length: ~24–30 inches
- Tassel length: ~6–8 inches
- Thread used: ~50–70 yards
- Time for cord: ~1.5–2 hours
- Total project time: 2–3 hours
Project Info
- One long cord + tassel end
- Skill level: ⭐ Beginner
- No shaping required
- Great for gifting
- Customizable length and color
Abbreviations — US Terms
STARTING RING: With your first color, chain 4 and join with a slip stitch to form a small ring. Keep this ring snug, since it sets the width of your entire cord.
ROUND 1: Work 6 sc into the ring. Do not join — instead, place a stitch marker in the first stitch and continue working in a spiral for the rest of the cord.
ROUNDS 2 ONWARD — Building the Cord: Sc in each stitch around, moving the stitch marker up each round. Continue in this simple spiral, without increasing or decreasing, until the cord measures your desired length, typically 24–30 inches. Stuffing the tube lightly with matching thread scraps as you go keeps the cord firm and gives it a rounder, more traditional shape.
CHANGING COLORS (OPTIONAL): To switch colors along the cord, finish the last stitch of one color, then draw the new color through the final loop before starting the next round. This creates a clean color break with no visible knot on the surface.
FASTEN OFF THE CORD: Once the cord reaches your desired length, sl st into the next stitch to close the round neatly, then fasten off leaving a 6-inch tail for attaching the tassel section.
MAKE THE TASSELS: Cut 20–30 strands of thread, each about 12–14 inches long, in your chosen colors. Fold the bundle in half and tie it tightly around the fastened-off end of the cord using the tail left in the previous step, then trim the tassel ends evenly.
ADD THE CAP BEAD: Slide a decorative cap bead over the tied point where the cord meets the tassels, then secure it in place with a few small stitches so it does not slip. This covers the knot and gives the parandi a polished, finished look.
OPTIONAL — BEADED TASSEL ENDS: Thread a few small beads onto individual tassel strands and knot below each bead to hold it in place. This adds a bit of weight and sparkle, and is especially popular for bridal-style parandis.
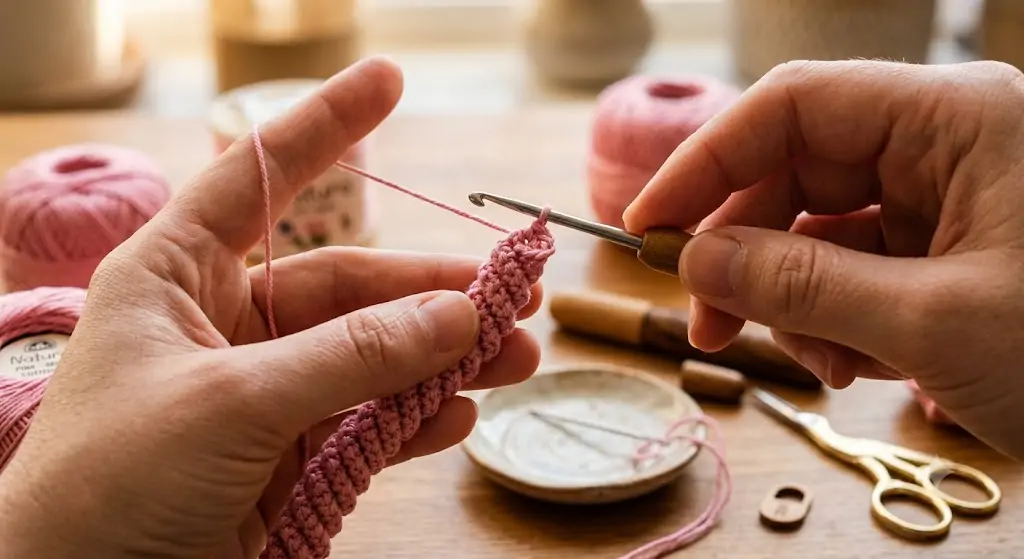
The single crochet cord taking shape — this tight spiral tube is the base of every crochet parandi pattern.
4. How to Finish and Attach the Tassels
Once your cord and tassels are made, finishing your crochet parandi pattern only takes a few extra minutes. This last stage is what turns a simple crocheted cord into a traditional, ready-to-wear parandi.
Step-by-Step Finishing
Even Out the Tassel Strands
Lay the tassel bundle flat and trim the ends so they are all the same length. An even, clean edge makes a noticeable difference in how finished the parandi looks once it is hanging from a braid.
Secure the Cap Bead Firmly
Make sure the cap bead or decorative ring sits snugly over the knot with no gaps, and stitch through it a few times with your needle so it cannot slide down onto the tassels over time.
Attach a Second Tassel (Optional)
Some traditional parandis have a small tassel or loop at the top of the cord as well, used to tie the parandi securely to the very top of the braid near the scalp. If you would like this feature, repeat the tassel-tying method from Step 6 of the pattern at the starting end of the cord too.
Weave In Any Remaining Ends
Use your tapestry needle to weave any loose color-change tails back into the body of the cord, so the surface stays smooth and comfortable against hair.
5. Color Combinations for Every Occasion
Choosing colors for a crochet parandi pattern is part of the fun, since the finished piece is usually meant to complement an outfit. Here are some of the most popular color directions for different occasions.
Popular Color Schemes
💍 Bridal Red & Gold
Deep red with gold or metallic thread accents. The most traditional choice for weddings and bridal functions.
🌸 Festive Pink
Hot pink with soft pink or white tassels. A favorite for Giddha performances and festival wear.
💙 Cool Blue
Royal blue fading into sky blue. Pairs beautifully with blue or white outfits for daytime events.
🌈 Multicolor Folk
A rainbow mix of bright colors, the classic look for Bhangra and folk dance costumes.
⚫ Black & Gold
A striking, modern combination that works well for evening functions and photoshoots.
💜 Soft Lavender
Purple fading to lilac and pale lavender. A gentle, elegant option for daytime or mehendi events.
Tips for Choosing Colors
Matching your crochet parandi to your outfit works best when you pick one dominant color from your dupatta or lehenga and repeat it in the cord, then use a contrasting or metallic thread for the tassels so they stand out against your hair. If you are making a parandi as a gift and are unsure of the occasion, a red and gold or multicolor version tends to suit the widest range of outfits and events.
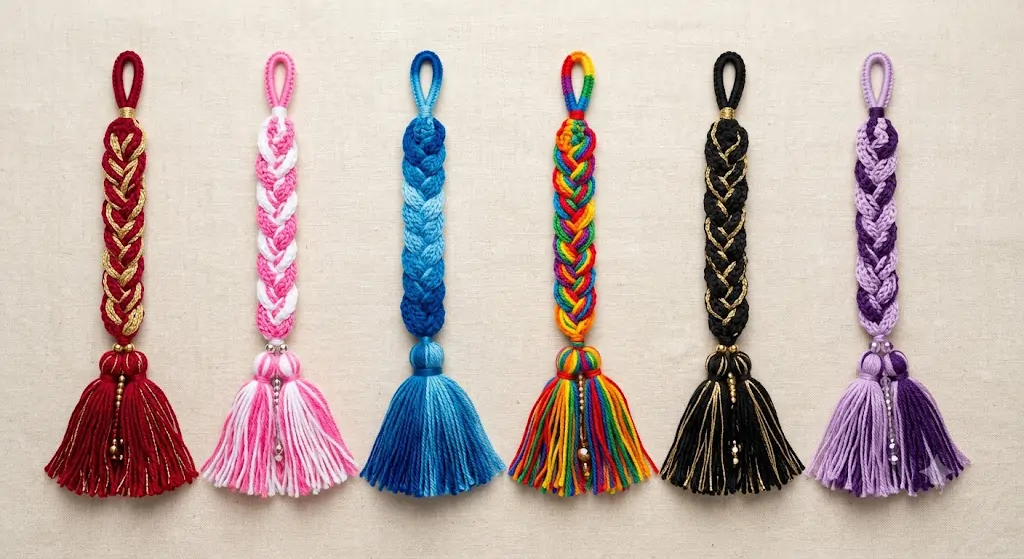
Six color directions for the crochet parandi pattern — which one matches your next outfit?
6. How to Wear and Style Your Parandi
Knowing how to wear a finished crochet parandi makes a real difference to how it looks once styled into hair. Here are the most common ways to wear one, along with a few styling tips.
Popular Ways to Wear a Parandi
Woven Into a Single Braid
Tie the top of the parandi near the base of the braid, then continue braiding your hair together with the cord all the way down, letting the tassel hang free at the end.
Two Braids, One Parandi Each
A traditional Punjabi style using two shorter parandis, one braided into each side plait, often seen in Giddha performances.
Bridal Braid Wrap
Wrapped around a low bridal bun or braid alongside floral strands, for a fuller, more decorative wedding-day look.
Loose Ponytail Accent
Tied at the base of a simple ponytail for a modern, everyday take on the traditional accessory.
Festival & Dance Wear
Paired with matching bangles and jhumka earrings for folk dance performances, where the swinging tassel adds movement.
Handmade Gift Idea
A finished crochet parandi makes a thoughtful handmade gift for weddings, birthdays, and festival season.
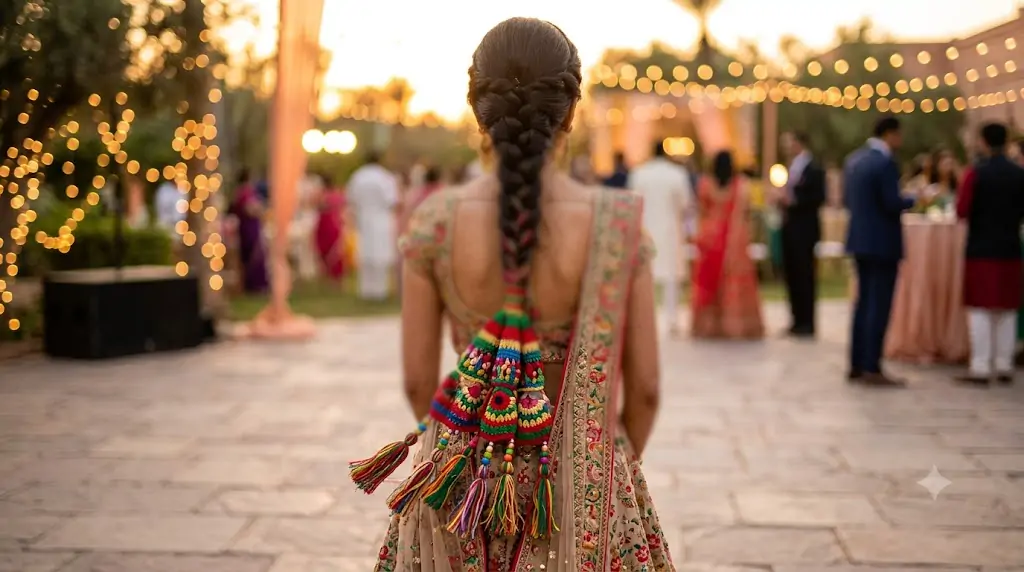
A crochet parandi woven into a braid — the tassel adds movement and color with every step.
7. Frequently Asked Questions About the Crochet Parandi Pattern
What thread is best for a crochet parandi?
A fine crochet cotton thread or a rayon/silk-finish embroidery thread both work well for a crochet parandi pattern. Rayon thread gives a slight shine that looks closer to traditional parandis, while cotton thread is sturdier for everyday wear. Either way, a smaller hook size around 2mm to 3.5mm keeps the cord tight enough to braid smoothly.
How long should a crochet parandi cord be?
Most parandi cords range from 24 to 30 inches long, though this depends on your hair length and how much of the cord you want visible below the braid. Longer hair generally needs a longer cord, since more of it will be woven in before the tassel section begins.
How long does it take to make a crochet parandi?
Most beginners can complete the cord for a crochet parandi pattern in about 1.5 to 2 hours, with tassel-making and finishing adding another 30 to 45 minutes. In total, the whole project usually takes 2 to 3 hours from start to finish.
Can I make a parandi without stuffing the cord?
Yes, a parandi cord can be left unstuffed for a lighter, more flexible feel, which some people prefer for everyday wear. However, lightly stuffing the tube with matching thread scraps as you crochet gives a firmer, rounder cord that holds its shape better and is closer to the traditional look.
How do I attach the parandi securely to my hair?
Tie the top of the parandi cord to the very base of your braid using a small elastic or thread loop before you begin braiding, then include the cord as a third strand as you plait your hair down. This keeps the parandi secure and prevents it from slipping out during wear.
Can I sell crochet parandis made from this free pattern?
Yes, this free crochet parandi pattern is available for both personal and commercial use, so you are welcome to sell finished parandis at craft fairs, wedding markets, or online shops. Handmade parandis are especially popular during wedding season and festival season. For more free crochet patterns, take a look at our free crochet pattern library.
Ready to Make Your Crochet Parandi? 🪢
Pick your colors, grab your hook, and get crocheting. Your braid is about to get so much more beautiful!
Explore More Free Crochet Patterns →





Reader discussion
Reader Comments
Tried this pattern? Share what worked, ask a question, or help another crocheter.
Your turn
Comments are moderated to keep the discussion useful and family-friendly. Please do not post personal information.