
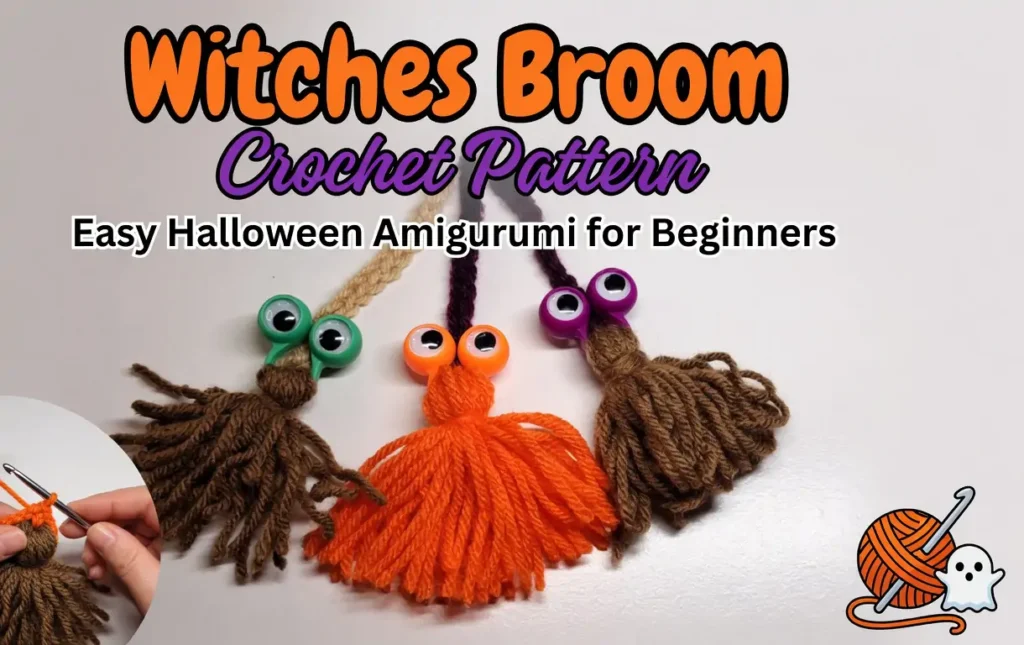
A small tassel broom with a crocheted hanging cord
One firm slip-stitch cord, 45 yarn wraps, and a securely tied neck make a simple Halloween ornament that matches the tassel style shown in the featured photo.
This free crochet witch’s broom pattern makes a small hanging decoration from worsted-weight yarn. The top loop is crocheted, while the broom head is formed as a full yarn tassel. The two parts are tied together before the tassel is cut, so the cord stays locked inside the top of the broom.
Only chain and slip stitch are needed. The pattern gives an exact cord count, cardboard measurement, wrap count, and neck placement. That removes the guesswork from the short pattern that was previously on this page.
This is a tassel-style Halloween ornament, not stuffed amigurumi. The crochet cord forms the hanger above the broom head. No wire, wooden stick, fiberfill, increases, or decreases are used.
Before You Start
The only crocheted piece is a narrow slip-stitch cord. After it is folded and sewn into a loop, its joined end is tied into the top of a yarn tassel. A second strand wraps around the tassel to form the broom’s neck.
Use a piece of firm cardboard that is exactly 4½ in. / 11.5 cm high. Each full wrap travels down one side and up the other, so 45 wraps use about 11¼ yd. / 10.3 m before knots and trimming.
- Make the foundation chain loose enough to enter with the hook.
- Count 30 slip stitches in the finished crochet cord.
- Wrap the tassel yarn 45 times without stretching it.
- Do not cut the bottom loops until the cord and neck are secure.
If chain and slip stitch are new to you, review the CrochetEco beginner crochet guide before starting.
Materials, Gauge, and Finished Size
About 8 yd. / 7.5 m of CYC #4 Medium smooth acrylic or cotton yarn for the crochet loop and ties.
About 18 yd. / 16.5 m of CYC #4 Medium yarn for the tassel bristles.
4 mm (G-6), or a size that makes a firm slip-stitch cord without splitting the yarn.
One piece of firm cardboard cut to 4½ in. / 11.5 cm high.
Tapestry needle, sharp scissors, ruler, and two removable stitch markers or clips.
Black yarn for embroidered eyes or small pieces of felt that can be sewn in place.
Gauge: exact gauge is not critical. The completed 30-slip-stitch cord should be firm and long enough to fold into a loop of about 2¾–3 in. / 7–7.5 cm. Do not pull the foundation chain tight while measuring.
Approximate finished size: the broom head is about 4¼–4½ in. / 11–11.5 cm from the tassel top to the trimmed ends. The full ornament is about 7–7½ in. / 18–19 cm long including the hanging loop. Yarn, hook size, and tension can change these measurements.
Smooth acrylic or cotton is easier to trim than fuzzy novelty yarn. Keep the cord yarn and tassel yarn close to the same thickness so the top does not look too heavy or too thin.
The Craft Yarn Council classifies worsted yarn as CYC #4 Medium. Brand thickness still varies, so measure your own cord before joining it to the tassel.
US Crochet Terms and Pattern Notes
ch = chain · sl st = slip stitch · st / sts = stitch / stitches
This pattern uses US crochet terms. The first chain from the hook is skipped and is not counted as a stitch. Each of the remaining 30 chains receives one slip stitch. The abbreviations follow the Craft Yarn Council crochet abbreviations.
Start with 31 chains. Skip the first chain from the hook and work into the remaining 30 chains. The finished cord therefore has exactly 30 slip stitches.
Crochet the Hanging Cord
Hanging Cord
Use the cord color. Keep the foundation chain relaxed so the slip stitches do not pull the cord into a tight curve.
Ch 31.
Sl st in the second ch from the hook and in each remaining ch. (30 sl sts)
Fasten off, leaving a 16 in. / 41 cm sewing tail.
The chain math is simple: 31 starting chains minus the one skipped chain leaves 30 foundation chains. Working one slip stitch into each of those chains gives 30 slip stitches.
Fold the cord
Fold the finished cord in half and line up the two short ends. The folded top becomes the hanging loop.
Sew the ends together
Thread the long tail through a tapestry needle. Sew through both short ends several times. Pull firmly so the base of the loop cannot open.
Keep the tail attached
Do not trim the sewing tail yet. Leave it at the base of the cord; it can be hidden inside the tassel during assembly.
Make and Secure the Tassel Broom
1. Wrap the Bristles
Hold the broom-color yarn against the 4½ in. / 11.5 cm cardboard card. Wrap the yarn around the card exactly 45 times. Keep the wraps beside one another and use light, even tension. Tight wraps will shrink after they are removed from the card.
Each complete wrap creates two yarn lengths after the bottom loops are cut. Forty-five wraps therefore produce 90 bristle ends. Before tying and trimming, the wraps use about 405 in. / 11¼ yd. / 10.3 m of yarn.
2. Lock the Crochet Cord into the Tassel
Cut the top tie
Cut a separate 20 in. / 51 cm strand in the cord color. Slide it beneath all 45 wraps at the top edge of the cardboard.
Add the cord
Pass the top tie through the sewn base of the crochet loop. Center the loop above the tassel wraps.
Tie a double knot
Bring the ends of the top tie together and make a tight double knot around all the wraps. The knot must hold both the tassel bundle and the sewn base of the crochet cord.
Remove the cardboard
Hold the top knot and slide the wrapped bundle off the cardboard. Do not cut the bottom loops yet.
3. Form the Neck
Cut one 30 in. / 76 cm strand in the cord color. Measure ½ in. / 1.3 cm below the top of the tassel. Wrap the strand snugly around the entire bundle eight times at that point.
Tie a square knot at the back. Thread both ends through a tapestry needle one at a time, pass them through the wrapped neck and into the center of the tassel several times, then trim the extra yarn.
4. Cut and Trim the Bristles
Cut every bottom loop
Insert sharp scissors through the folded loops at the bottom of the tassel. Cut once through the center of each loop.
Smooth with your fingers
Separate any strands caught inside the bundle. Do not brush the yarn; brushing can damage or fuzz some fibers.
Trim the broom shape
Trim the bristles to about 3¾–4 in. / 9.5–10 cm from the neck. Cut straight across for an even tassel or leave a few ends slightly uneven for a twig-broom look.
Hold the tassel below the neck and pull the crochet loop gently. The top knot should not move. If it loosens, add another cord-color strand through the loop base and around the tassel top before trimming any ends.
Optional Embroidered Face
The broom does not need a face. To echo the character style in the old featured photo without adding loose plastic pieces, use black yarn to make two small French knots or two short satin stitches on the front of the wrapped head. Keep them level and weave both ends into the tassel center.
How to Change the Size
Make only one change at a time. This makes it easier to keep the loop and broom head in proportion.
| Change | What it affects | What to check |
|---|---|---|
| Add cord chains | Makes the hanging loop longer. | Work one slip stitch in every chain except the first skipped chain. |
| Use taller cardboard | Makes the bristles longer. | Each extra inch of card adds about one inch to the untrimmed bristles. |
| Add more wraps | Makes the tassel fuller. | A very full tassel needs a longer top tie and neck strand. |
| Use fewer wraps | Makes a lighter, thinner broom. | Do not reduce the wraps so far that the securing knots become visible. |
| Change yarn weight | Changes the whole ornament. | Choose a hook that lets the slip-stitch cord lie flat without gaps. |
For a smaller ornament, use lighter yarn, a smaller matching hook, and a shorter cardboard card. Keep the same 45-wrap count for similar fullness, then adjust only after seeing the first tassel.
Common Problems and Easy Fixes
The crochet cord twists or curves.
The foundation chain is probably tighter than the slip stitches. Remake the chain with a larger hook or loosen the chain tension, then return to the 4 mm hook for the slip stitches.
I counted fewer than 30 slip stitches.
Lay the chain flat and look for one unworked V. Start in the second chain from the hook and work once into each of the remaining 30 chains.
One side of the tassel is shorter.
The yarn probably crossed the cardboard at an angle or shifted while wrapping. Smooth all wraps before tying the top and keep the cardboard edges square.
The hanging loop pulls out of the tassel.
The top tie must pass through the sewn base of the crochet cord before it is knotted around the wraps. Retie that connection before forming the neck.
The neck wrap slides down.
Place it only ½ in. below the top, wrap eight times with even tension, and secure the square knot by passing both ends through the wrapped neck and tassel center.
Safety, Care, and Crochet Broom FAQ
This broom is a decoration, not a toy. The long loop, tassel strands, knots, and any optional hardware can create entanglement or small-part risks. Keep it away from babies, young children, and pets. Yarn can burn, so do not hang it near candles, fireplaces, stovetops, or other heat sources.
Follow the washing instructions on the yarn label. Spot cleaning is usually easiest. If you hand wash the ornament, use cool water, press out moisture without twisting, reshape the tassel, and dry it flat. Check both the top knot and neck wrap before hanging it again.
Is this suitable for a first crochet project?
The cord uses only chain and slip stitch. A new crocheter may need help keeping the foundation chain loose and sewing the cord ends together, but the stitch work is basic.
Can I use cotton yarn?
Yes. Cotton makes a heavier tassel with clear strands. Acrylic also works and often feels lighter. Use the same yarn weight for the cord and bristles.
Can I use plastic googly eyes?
Only on a display piece that stays away from children and pets. Glued or plastic eyes can come loose and become a choking hazard. Embroidered yarn eyes are the safer option.
Can I use it as a keychain?
It is better as a light bag charm or ornament. Tassel yarn and handmade loops wear with friction, so do not rely on this piece to hold important keys.
Finish the Broom
Before trimming the last end, check the two places that hold the ornament together: the double knot at the tassel top and the eight-wrap neck. The loop should remain centered when you lift the broom, and the tassel should not shift under the neck wrap.
If you want another seasonal project, try the crochet Halloween wind spinner or browse these easy fall crochet projects.
Find Another Free Crochet Pattern
Browse clear project guides with materials, stitch notes, and counts you can check as you work.
Browse the Pattern Library →

Reader discussion
Reader Comments
Tried this pattern? Share what worked, ask a question, or help another crocheter.
Your turn
Comments are moderated to keep the discussion useful and family-friendly. Please do not post personal information.