
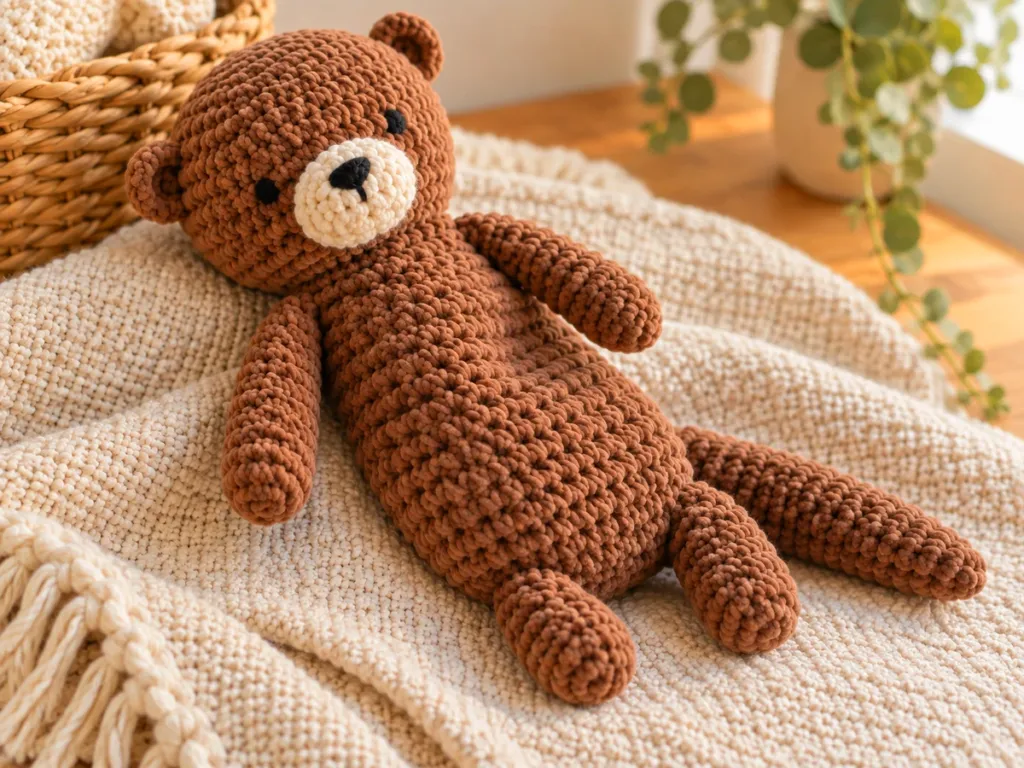
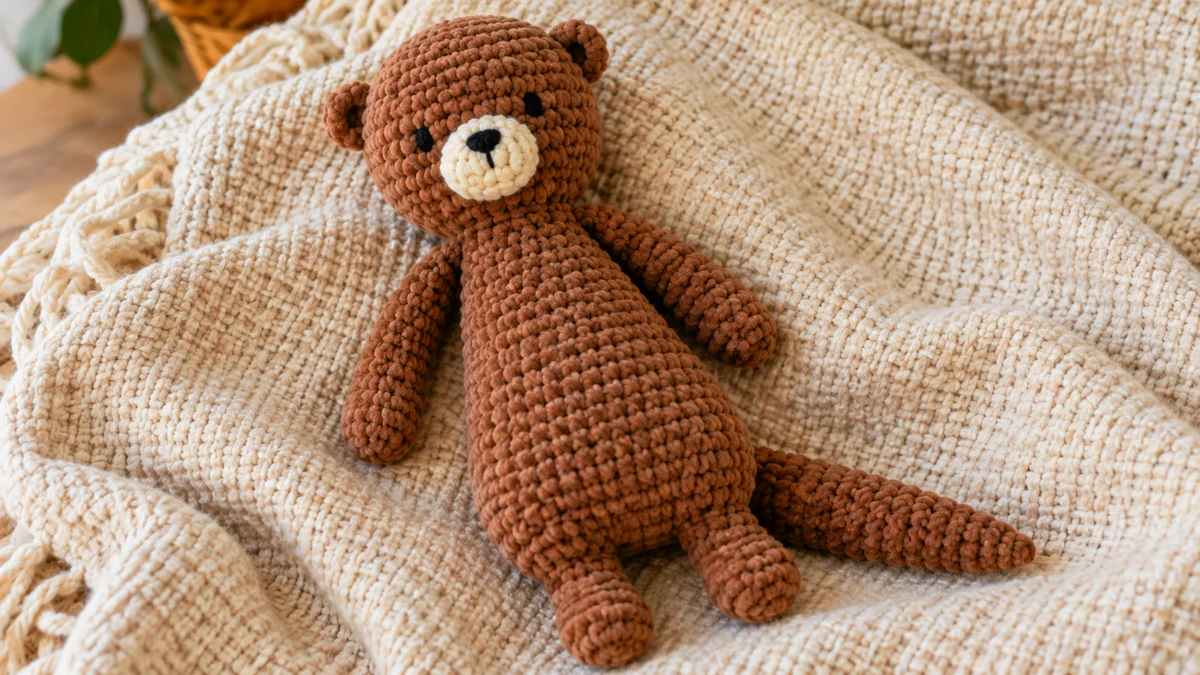
A soft otter with a stuffed head and a floppy snuggler body
Exact round counts, crocheted-in arms and legs, embroidered eyes, and only a few small seams to finish.
This crochet otter snuggler pattern is free and designed with clear stitch counts from start to finish. It makes a soft otter with a round stuffed head, an unstuffed floppy body, simple arms and legs, and a long tapered tail. Every shaping round ends with a stitch count, so you can catch a mistake before it changes the finished shape.
The arms and legs are crocheted directly into the body as you work. You only sew the head, muzzle, ears, and tail. This crochet otter snuggler pattern also uses yarn embroidery for the face instead of plastic eyes, keeping the finished design soft and simple.
1. What Is a Crochet Snuggler?
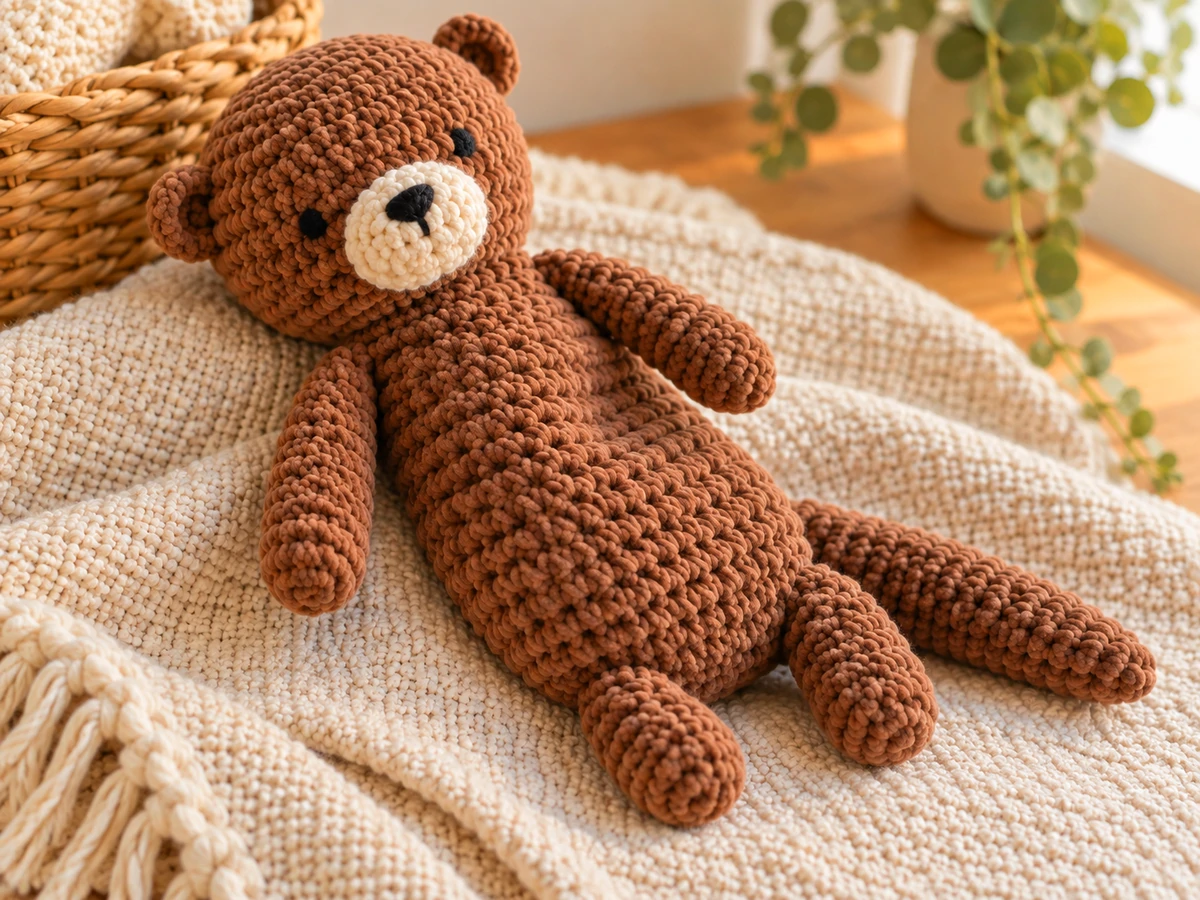
The word snuggler is used a little differently by different crochet designers. In this crochet otter snuggler pattern, it means a crochet animal with a stuffed head and a soft body that is intentionally left unstuffed.
That gives the finished otter more movement than a fully stuffed amigurumi toy. The body folds naturally when you pick it up, while the stuffed head keeps the face and ears in shape.
The body is intentionally left empty. If you fill the body with fiberfill, you will make a regular plush otter instead of the floppy snuggler shown in this guide.
2. Crochet Otter Snuggler Pattern Materials and Gauge
CYC #6 Super Bulky plush or chenille yarn in medium brown. A large ball with around 200 yards gives you a comfortable planning allowance; exact use changes with yarn and tension.
A small amount of cream #6 yarn for the muzzle, plus black yarn for the embroidered eyes and nose.
Start with 9 mm. If the fabric has holes large enough to show the stuffing in the head, move down one hook size.
Polyester fiberfill for the head only. A tiny amount is optional in the very ends of the paws.
Locking stitch marker, yarn needle, scissors, and a few removable pins for positioning the face before sewing.
About 8 sc and about 8 rounds = 4 in. / 10 cm. Exact gauge is less important than making a firm fabric.
For this crochet otter snuggler pattern, plush or chenille yarn gives the softest result. If you are unsure how yarn numbers and hook sizes work, see the CrochetEco crochet hook size chart . Plush yarn can vary a lot between brands, so let the finished fabric help you choose your final hook size.
For a standard yarn reference, see the Craft Yarn Council Standard Yarn Weight System . It classifies #6 yarn as Super Bulky and gives general hook and gauge ranges.
The approximate 16-inch finished length assumes yarn and tension close to the target gauge. A different chenille yarn can make the same stitch counts larger or smaller.
3. US Crochet Terms and Pattern Notes
This crochet otter snuggler pattern uses US crochet terms. The main pieces are worked in continuous spiral rounds, so do not slip stitch to join unless a step specifically tells you to do so.
MR = magic ring · ch = chain · sc = single crochet · hdc = half double crochet · inc = 2 sc in the same stitch · dec = single crochet decrease / sc2tog · st / sts = stitch / stitches · FO = fasten off
Place a locking marker in the first stitch of every round and move it up as you work. The number in parentheses at the end of a round is the number of stitches you should have after that round is complete.
If the magic ring is new to you, use the CrochetEco magic circle tutorial first.
If your stitch count does not match the number shown at the end of the round, fix that round first. Do not try to compensate with a random increase or decrease later.
4. Make the Arms and Legs for the Crochet Otter Snuggler Pattern
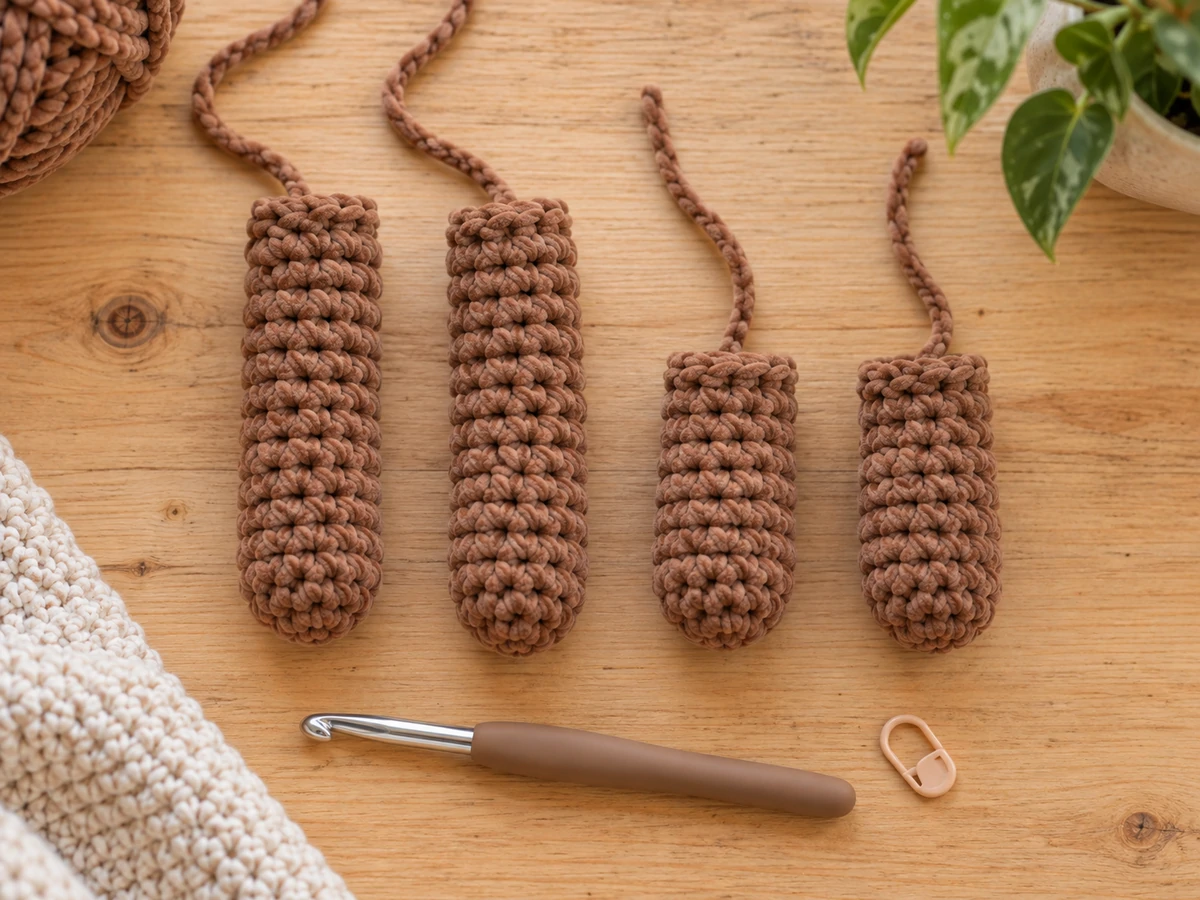
Make all four limbs before you begin the body. Their flat top edges will be crocheted directly into the body, which removes four sewing seams and keeps the finished snuggler flexible.
Arms — Make 2
Use brown yarn. Work in continuous rounds.
MR, 6 sc. (6)
Inc in each stitch around. (12)
Sc in every stitch around. (12 each round)
Leave the arm unstuffed, or put only a tiny pinch of fiberfill in the very bottom. Flatten the opening so 6 stitches sit in front of 6 stitches. Work 6 sc across, inserting the hook through both layers each time. (6 closing sts) FO.
Legs — Make 2
Use brown yarn. These are shorter than the arms.
MR, 6 sc. (6)
Inc in each stitch around. (12)
Sc in every stitch around. (12 each round)
Leave unstuffed or add only a tiny pinch at the paw. Flatten and work 6 sc across both layers. (6 closing sts) FO.
5. Crochet the Otter Head
The head in this crochet otter snuggler pattern is worked from the top down. It reaches 36 stitches at the widest point, stays at that count for five straight rounds, then decreases to an 18-stitch neck opening.
Otter Head
MR, 6 sc. (6)
Inc around. (12)
[Sc in next st, inc] repeat 6 times. (18)
[Sc in next 2 sts, inc] repeat 6 times. (24)
[Sc in next 3 sts, inc] repeat 6 times. (30)
[Sc in next 4 sts, inc] repeat 6 times. (36)
Sc in every stitch around. (36 each round)
[Sc in next 4 sts, dec] repeat 6 times. (30)
[Sc in next 3 sts, dec] repeat 6 times. (24)
[Sc in next 2 sts, dec] repeat 6 times. (18)
Stuff the head evenly. Keep the stuffing inside the head rather than pushing it through the neck opening. FO and leave a long tail, about 18 inches, for joining the head to the body later.
6. Crochet the Body and Join the Limbs
The body of the crochet otter snuggler pattern starts at the lower center, grows to 30 stitches, then narrows to an 18-stitch neck. It stays unstuffed. The legs are joined in Round 9 and the arms in Round 15.
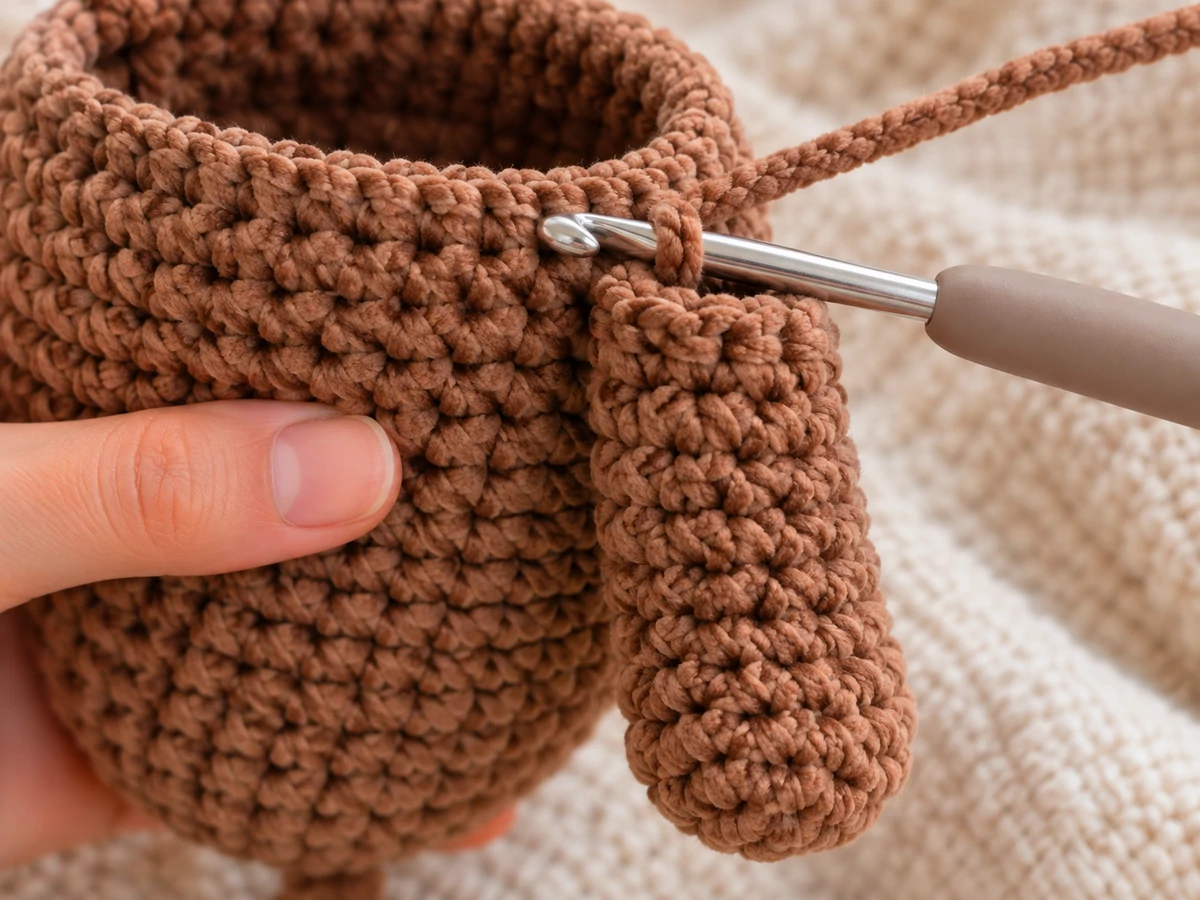
How to crochet a limb into the body: place the flattened 6-stitch top edge of the limb against the outside of the next 6 body stitches. For each stitch, insert your hook through the next body stitch and through the matching closing stitch on the limb. Finish one sc through both layers. Repeat across all 6 stitches. These 6 stitches are part of the body round — do not add another 6 stitches afterward.
Otter Body
Keep the round marker at the back of the body. This helps keep both legs on the front and the arms near the sides.
MR, 6 sc. (6)
Inc around. (12)
[Sc in next st, inc] repeat 6 times. (18)
[Sc in next 2 sts, inc] repeat 6 times. (24)
[Sc in next 3 sts, inc] repeat 6 times. (30)
Sc around. (30 each round)
Join the legs: sc 7. Join Leg 1 over the next 6 body stitches. Sc 4. Join Leg 2 over the next 6 body stitches. Sc 7. (30)
Sc around. (30 each round)
Join the arms: sc 2. Join Arm 1 over the next 6 body stitches. Sc 14. Join Arm 2 over the next 6 body stitches. Sc 2. (30)
Sc around. (30 each round)
[Sc in next 3 sts, dec] repeat 6 times. (24)
Sc around. (24)
[Sc in next 2 sts, dec] repeat 6 times. (18)
Sc around. (18)
Do not stuff the body. FO and weave the body yarn tail inside. Keep the 18-stitch neck opening open for the head.
7. Tail, Muzzle, and Ears
These small pieces complete the crochet otter snuggler pattern. Keep the tail soft and unstuffed, keep the muzzle flat, and make both ears the same size before assembly.
Tapered Otter Tail — Make 1
MR, 6 sc. (6)
[Sc in next 2 sts, inc] repeat 2 times. (8)
Sc around. (8 each round)
[Sc in next 3 sts, inc] repeat 2 times. (10)
Sc around. (10 each round)
Flatten the opening and work 5 sc through both layers. (5 closing sts) FO, leaving a long sewing tail.
Cream Muzzle — Make 1
With cream yarn, MR, 6 sc. (6)
Inc around. (12)
FO with a long sewing tail. Leave the circle flat; do not stuff it.
Small Rounded Ears — Make 2
Ch 2. Work 5 hdc into the second chain from the hook. Do not join. FO with a long sewing tail. (5 hdc)
8. Assemble the Crochet Otter Snuggler Pattern
Pin the muzzle first
Center the cream muzzle on the lower front of the head, roughly over Rounds 9–12. Pin it before sewing so you can check the face from straight ahead.
Sew the muzzle flat
Use the cream yarn tail to sew around all 12 outer stitches. Keep the muzzle flat against the face. Weave the tail inside the head.
Embroider the face
With black yarn, make two small eyes between about Rounds 7 and 8, around five stitches apart. Embroider a small dark nose at the upper center of the cream muzzle. Add one short vertical stitch below the nose if you want a simple mouth.
Add the ears
Pin one ear on each upper side of the head, roughly between Rounds 5 and 7. The rounded hdc edge faces outward. Check that both ears sit at the same height before sewing them down.
Sew on the tail
Center the 5-stitch closed base of the tail on the back of the lower body, close to the round-marker line. Sew the base securely so the narrow tip hangs downward.
Join the head to the body
Place the 18-stitch head opening directly over the 18-stitch body opening. Make sure the face points toward the same side as the legs. Using the long brown tail from the head, sew one head stitch to one body stitch all the way around: 18 matches to 18.
Check the final shape
The head should stay rounded and stuffed. The torso should fold and drape when lifted. The arms and legs should hang from the body without extra sewing seams.
9. Crochet Otter Snuggler Pattern Math Check
Use this crochet otter snuggler pattern count table whenever a piece looks too wide, too narrow, or uneven. These are the main stitch-count checkpoints to compare before moving on.
| Piece | Count path | Important check |
|---|---|---|
| Head | 6 → 12 → 18 → 24 → 30 → 36 → 30 → 24 → 18 | Rounds 7–11 stay at 36. Final neck = 18. |
| Body | 6 → 12 → 18 → 24 → 30 → 24 → 18 | Leg and arm joining rounds both remain at 30. |
| Each arm | 6 → 12 | Top closes to 6 attachment stitches. |
| Each leg | 6 → 12 | Top closes to 6 attachment stitches. |
| Tail | 6 → 8 → 10 | 10-stitch base flattens to 5 closing stitches. |
| Muzzle | 6 → 12 | Flat 12-stitch circle. |
| Head/body seam | 18 ↔ 18 | Every head stitch has one matching body stitch. |
Each limb replaces six normal body stitches for that round. You still work exactly six single crochets across that section — the only difference is that each stitch also passes through the limb edge.
10. Common Crochet Otter Snuggler Pattern Problems
The stuffing shows through the head.
Move down one hook size and make a small test circle. A toy needs firmer fabric than a blanket because the stuffing pushes against the stitches from inside.
One leg points backward.
Check the limb before the first attachment stitch. The paw should hang outside the body with the closed six-stitch edge lying flat against the next six body stitches.
My body has more than 30 stitches after joining a limb.
You probably crocheted six body stitches and then added six more stitches for the limb. The limb replaces those six body positions; it does not add six new stitches.
The face looks crooked even though the stitch counts are right.
Do not use the spiral round marker as the center of the face. Pin the muzzle, ears, and eye positions visually while looking at the head from straight ahead, then sew only after the face looks balanced.
The finished body feels like a regular stuffed animal.
The body should not contain fiberfill. Only the head needs full stuffing. Remove body stuffing before joining the neck if you want the floppy snuggler shape shown here.
11. Care and Child-Safety Notes
Follow the washing and drying instructions printed on your yarn label. Chenille yarns can have very different fiber content, so one care method does not fit every brand.
This crochet otter snuggler pattern uses yarn-embroidered eyes and nose instead of loose plastic facial pieces. If the finished otter is intended for a young child, secure every seam and yarn end carefully and inspect it regularly for damage. A handmade snuggler is not an infant sleep product; keep soft toys and other soft objects out of an infant’s crib or sleep area.
For general toy-safety information, see the U.S. Consumer Product Safety Commission toy safety guidance . If you sell finished crochet toys, also check the product-safety and labeling rules that apply where you sell them.
12. Crochet Otter Snuggler Pattern FAQ
Is this crochet otter snuggler pattern for beginners?
It is best for a confident beginner who already knows single crochet, increases, decreases, a magic ring, and continuous rounds. The limb-joining technique may be new, but it uses ordinary single crochet stitches.
Is this a no-sew crochet otter snuggler pattern?
No. It is low-sew. The arms and legs are crocheted into the body, but you still sew the head, two ears, muzzle, and tail.
Can I use worsted weight yarn instead of chenille?
Yes. Keep the stitch counts the same and choose a hook that gives you firm fabric. The otter will be much smaller, so the 16-inch finished-size estimate will no longer apply.
Can I stuff the body?
You can, but it changes the project. A filled body makes a regular plush otter. For the snuggler version, stuff the head and leave the torso empty.
Can I use plastic safety eyes?
The written design uses embroidered yarn eyes. That keeps the finished appearance consistent with the pattern and avoids adding detachable facial pieces.
What if I cannot make a magic ring with chenille yarn?
Ch 2 and work the first 6 sc into the second chain from your hook. Then continue with Round 2 exactly as written.
Final Thoughts on This Crochet Otter Snuggler Pattern
This crochet otter snuggler pattern keeps the shaping simple: one round head, one soft body, four basic limbs, a flat muzzle, two tiny ears, and one tapered tail.
The most important part is counting as you work. The head finishes with 18 stitches, the body finishes with 18 stitches, and every limb attachment keeps the body at the same round count. That makes the final assembly much easier to check before you sew anything permanently.
If this is your first plush project, work slowly and move your stitch marker every round. If you need a refresher before starting, the CrochetEco beginner crochet guide covers the basic stitches first.
Find Your Next Free Crochet Pattern
Beginner-friendly projects, clear stitch counts, and practical instructions you can check as you work.
Browse the Pattern Library →

Reader discussion
Reader Comments
Tried this pattern? Share what worked, ask a question, or help another crocheter.
Your turn
Comments are moderated to keep the discussion useful and family-friendly. Please do not post personal information.