
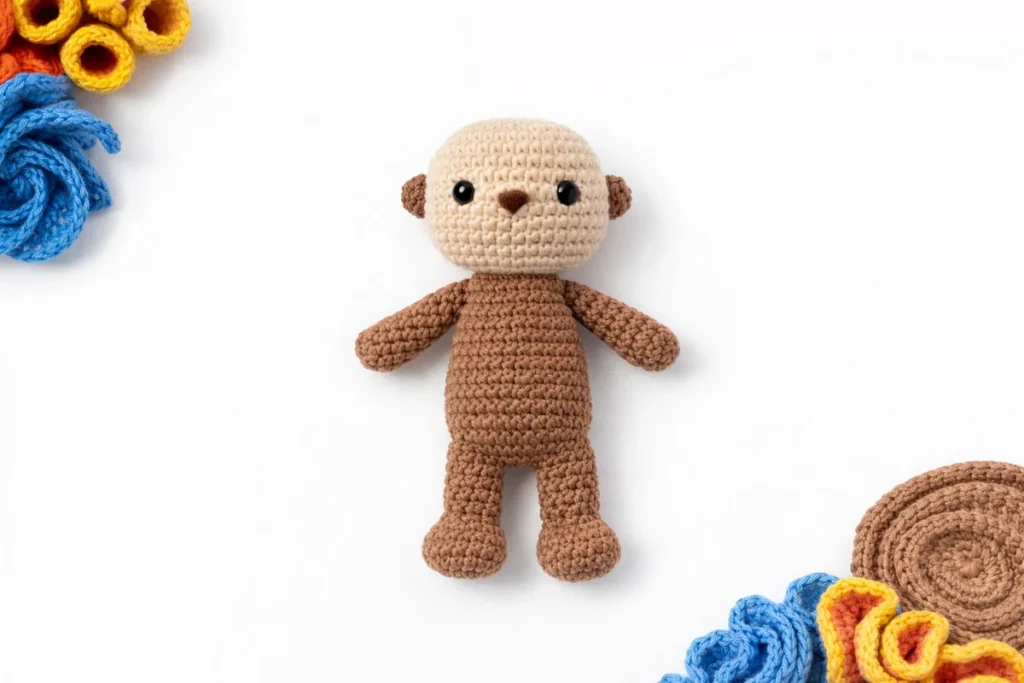
This free sea otter crochet pattern makes a soft, palm-sized amigurumi with a round muzzle, small ears, sturdy tail, and arms that can hold a shell or tiny heart. The head and body are worked as one piece, so beginners have less sewing to manage.
Every round and stitch count is included below. If you can make a magic ring, single crochet, increase, and invisible decrease, you can finish this otter in one relaxed afternoon.
Supplies for Your Crochet Sea Otter
- Worsted-weight cotton or acrylic yarn: about 70 yd / 64 m in brown
- Small amount of cream yarn for the muzzle and paws
- 4 mm (G/6) crochet hook, or a smaller hook if your stitches leave gaps
- Two 9 mm safety eyes, or black yarn for embroidered eyes
- Black or dark-brown embroidery thread for the nose
- Polyester stuffing, stitch marker, yarn needle, pins, and scissors
Abbreviations and Pattern Notes
This pattern uses US crochet terms: MR = magic ring, ch = chain, sc = single crochet, inc = 2 sc in one stitch, dec = invisible decrease, sl st = slip stitch, st(s) = stitch(es), and FO = fasten off.
- Work in continuous rounds unless the instructions say otherwise.
- Place a marker in the first stitch and move it up after every round.
- The number in parentheses is the stitch count at the end of the round.
- Gauge is not critical, but the fabric must be tight enough to hide the stuffing.
Need help starting in the round? Follow the magic circle crochet tutorial. You can also check the crochet hook size chart if you change yarn weight.
Free Sea Otter Crochet Pattern
Head and Body — Make One in Brown
Start at the top of the head. The body continues directly from the neck.
- R1: 6 sc in MR. (6)
- R2: Inc in each st around. (12)
- R3: (Sc, inc) 6 times. (18)
- R4: (2 sc, inc) 6 times. (24)
- R5: (3 sc, inc) 6 times. (30)
- R6: (4 sc, inc) 6 times. (36)
- R7–R13: Sc in each st around. (36)
- R14: (4 sc, dec) 6 times. (30)
- R15: (3 sc, dec) 6 times. (24)
- R16: (2 sc, dec) 6 times. (18)
Place the eyes between R10 and R11, about 7 stitches apart. Begin stuffing the head firmly, shaping it into a smooth oval.
- R17: Sc in each st around. (18)
- R18: (2 sc, inc) 6 times. (24)
- R19: (3 sc, inc) 6 times. (30)
- R20–R27: Sc in each st around. (30)
- R28: (3 sc, dec) 6 times. (24)
- R29: (2 sc, dec) 6 times. (18)
- R30: (Sc, dec) 6 times. (12)
- R31: Dec 6 times. (6)
Finish stuffing before R31. FO with a long tail, thread it through the front loops of the remaining 6 stitches, pull closed, and weave the end inside.
Cream Muzzle — Make One
- R1: Ch 5. Starting in the second ch from the hook, sc in the next 3 ch, 3 sc in the last ch. Work down the other side of the chain: sc in the next 2 ch, 2 sc in the last ch. (10)
- R2: Inc, 2 sc, inc in each of the next 3 sts, 2 sc, inc in each of the last 2 sts. (16)
Sl st in the next stitch and FO with a long sewing tail. Pin the muzzle between the eyes, covering approximately R10–R13. Add a small amount of stuffing, then sew around the edge. Embroider a small inverted triangle for the nose and one short vertical line below it.
Ears — Make Two in Brown
Make 6 sc in a MR. Pull the ring tight but do not join the ends; the open circle forms a small semicircle. FO with a sewing tail. Sew the ears to the sides of the head across R8–R10.
Arms — Make Two
- R1, cream: 6 sc in MR. (6)
- R2: (Sc, inc) 3 times. (9)
- R3: Sc around. Change to brown in the final stitch. (9)
- R4–R9, brown: Sc around. (9)
Stuff only the lower half. Flatten the opening and sc through both layers with 4 sc. FO with a long tail.
Feet — Make Two
- R1, cream: 6 sc in MR. (6)
- R2: Inc around. (12)
- R3: Sc around. Change to brown in the final stitch. (12)
- R4: (2 sc, dec) 3 times. (9)
- R5–R6: Sc around. (9)
Add a small pinch of stuffing, flatten the opening, and sc through both layers with 4 sc. FO with a long tail.
Tail — Make One in Brown
Begin at the narrow tip and work toward the wider base.
- R1: 6 sc in MR. (6)
- R2–R3: Sc around. (6)
- R4: (Sc, inc) 3 times. (9)
- R5–R8: Sc around. (9)
- R9: (2 sc, inc) 3 times. (12)
- R10–R12: Sc around. (12)
Stuff lightly so the tail stays flexible. Flatten the open edge and FO with a long sewing tail.
How to Assemble the Sea Otter
- Pin before sewing. Place both arms at R19–R23, angled slightly toward the belly. Check the front view, then sew the top edges securely.
- Add the feet. Position them at the lower front of the body around R27–R30, leaving a small gap between them.
- Attach the tail. Sew the wide edge to the center back across R24–R28. Add a few extra stitches along one side so it rests naturally beside the body.
- Shape the face. If desired, add two short cream stitches beside the muzzle as whisker marks. Hide all yarn ends inside the toy.
Common Amigurumi Problems
| Problem | Likely cause | Simple fix |
|---|---|---|
| Stuffing shows through | Hook is too large or tension is loose | Move down one hook size and keep the yarn relaxed but firm |
| Head looks lumpy | Large pieces of stuffing were added at once | Add small tufts and shape the head between rounds |
| Eyes look uneven | Placement was not checked before locking | Insert both eyes, count the stitches, then attach the washers |
| Body leans | An increase or decrease was missed | Count every round and compare with the number in parentheses |
Care and Customization
Spot-clean the finished otter with cool water and mild soap, then let it air-dry completely. If every feature is embroidered and the yarn label permits washing, place the toy in a mesh bag and use a gentle cycle. Never machine-dry a toy with plastic safety eyes.
For a personal variation, make the muzzle and paws in oatmeal, pale gray, or soft tan. You can also crochet a tiny shell for the arms or embroider closed sleepy eyes. Keep the yarn weight and hook size consistent so all parts remain proportional.
Sea Otter Crochet Pattern FAQ
Is this sea otter pattern suitable for a complete beginner?
Yes, if you already know single crochet, increase, and decrease. The head and body are one piece, and the stitch count is shown after every round.
Can I use a different yarn weight?
Yes. Thinner yarn makes a smaller otter and thicker yarn makes a larger one. Choose a hook that creates dense fabric and use eyes sized for the new head.
Why does my amigurumi spiral?
Continuous rounds naturally shift slightly. Keep the stitch marker in the first stitch of each round; the small shift will not affect the finished toy.
Can I sell finished otters made from this pattern?
Yes. You may sell finished handmade otters in small quantities. Please credit CrochetEco for the pattern and do not copy or resell the written instructions.
Final Check
Count the final rounds, tug gently on each sewn piece, and make sure no stuffing is visible. Your finished otter should measure about 6 inches (15 cm) with worsted yarn and a 4 mm hook, but a small size difference is normal.


Reader discussion
Reader Comments
Tried this pattern? Share what worked, ask a question, or help another crocheter.
Your turn
Comments are moderated to keep the discussion useful and family-friendly. Please do not post personal information.